GadgetInspector源码分析 前置废话 我不想搞介绍,就这样吧,写这个主要是网上的对我很晦涩,很多别人觉得简单的我不会,包括一些汇编指令等,当然本篇也是站在很多前辈的肩膀上进行学习,属实是少花了很多功夫
在分析gadgetinspector源码的时候,大概会对各个核心类讲解,并简单分析ASM部分,btw本篇基于jdk8进行分析
当然既然是学习,那么我们肯定是需要跟踪代码的,而GI这款工具属实头疼,本身不仅引入了jdk的一些依赖如rt.jar,在调试的过程当中也出现了gadgetinspector当中的类,属实不适合学习时使用,为了解决这个问题,我在gadgetinspector.ClassResourceEnumerator#getAllClasses当中将源码修改如此,这样我便能自行写代码逻辑,并展开学习,我个人认为化繁为简也是一个很重要的过程,如下我剔除了jdk原本的类,并且要求全类名包含特定字符,因此解决了这个问题,当然在具体使用的时候还是要替换回来
1
2
3
4
5
6
7
8
9
10
11
12
public Collection<ClassResource> getAllClasses () throws IOException Collection<ClassResource> result = new ArrayList<>(); if (ConfigHelper.onlyJDK) return result; for (ClassPath.ClassInfo classInfo : ClassPath.from(classLoader).getAllClasses()) { if (classInfo.getName().contains("yyds" )){ result.add(new ClassLoaderClassResource(classLoader, classInfo.getResourceName())); } } return result; }
可以看到经过简单的优化,过程也更加清晰,但是在后面有些地方需要改回来不然得不到正确结果,这里是为了分析所以暂时改一下
在学习的时候配合反汇编代码会更容易理解,Java也自带了查看的方法javap -c 类名
lol,多逼逼一句一定要在熟悉jvm stack和本地变量表,不然很多逻辑会是懵的
ASM部分 这部分不建议直接看,建议在后面看到具体部分再来看看
模拟JVM栈帧变化 这部分很重要如果搞不明白后面在看GI代码的时候会很懵逼
在程序运行的过程中,每一个线程都对应一个属于自己的JVM Stack。当一个新线程开始时会在内存上分配一个属于自己的JVM Stack;当该线程执行结束后,相应的JVM Stack内存空间也就被回收了。
在JVM Stack当中,是栈的结构,里面存储的是frames;每一个frame空间可以称之为Stack Frame。当调用一个新方法的时候,就会在JVM Stack上分配一个frame空间;当方法退出时,相应的frame空间也会JVM Stack上进行清除掉(出栈操作)。在frame空间当中,有两个重要的结构,即local variables(一个索引从0开始的数组)和operand stack(栈的结构)。对于每一个方法来说,它都是在自己的Stack Frame上来运行的,在编译的时候,就决定了local variables和operand stack的大小。
这里特别要注意在方法刚开始的时候,operand stack是空,不需要存储任何的数据,而local variables的初始状态,则需要考虑三个因素:
当前方法是否为static方法。如果当前方法是non-static方法,则需要在local variables索引为0的位置存在一个this变量;如果当前方法是static方法,则不需要存储this。 当前方法是否接收参数。方法接收的参数,会按照参数的声明顺序放到local variables当中。 方法参数是否包含long或double类型。如果方法的参数是long或double类型,那么它在local variables当中占用两个位置。 这里推荐一个IDEA的插件ASM Bytecode Viewer,可以很方便配合学习理解,同时如果需要查当中的汇编指令的含义也很简单,去官网看看就好https://docs.oracle.com/javase/specs/jvms/se15/html/jvms-6.html
ClassVisitor 我们只要知道在ClassVisitor类当中,定义的visitXxx()方法中的参数与ClassFile结构密切相关就很关键了
首先看看里面的字段
1
2
3
4
5
6
public abstract class ClassVisitor protected final int api; protected ClassVisitor cv; }
ClassVisitor当中许多的visitXxx()方法,这些visitXxx()方法与ClassFile的结构密切相关,而这下面四个才是我们关注的主体
1
2
3
4
5
6
7
8
9
10
11
12
13
14
15
16
17
18
19
20
21
22
public abstract class ClassVisitor public void visit ( final int version, final int access, final String name, final String signature, final String superName, final String[] interfaces) public FieldVisitor visitField ( // 访问字段 final int access, final String name, final String descriptor, final String signature, final Object value) public MethodVisitor visitMethod ( // 访问方法 final int access, final String name, final String descriptor, final String signature, final String[] exceptions) public void visitEnd () }
其中signature为类签名(非泛型为NUll),同时visitXxx()方法,也有调用顺序,了解下就好,结合这个调用顺序,GI的这部分代码就很好懂了
1
2
3
4
5
6
7
8
9
10
11
12
13
14
15
visit [visitSource][visitModule][visitNestHost][visitPermittedSubclass][visitOuterClass] ( visitAnnotation | visitTypeAnnotation | visitAttribute )* ( visitNestMember | visitInnerClass | visitRecordComponent | visitField | visitMethod )* visitEnd
MethodVisitor 和上面很多部分相似,我们直接入正文,也是有很多关键的visitxxx方法,对一些我们需要的做个精简的调用,看英文名称就能知道意思就不多说每个部分了
1
2
3
4
5
6
7
8
9
10
11
12
13
14
15
16
17
18
(visitParameter)* [visitAnnotationDefault] (visitAnnotation | visitAnnotableParameterCount | visitParameterAnnotation | visitTypeAnnotation | visitAttribute)* [ visitCode ( visitFrame visitXxxInsn | visitLabel | visitInsnAnnotation | visitTryCatchBlock | visitTryCatchAnnotation | visitLocalVariable | visitLocalVariableAnnotation | visitLineNumber )* visitMaxs ]
这里主要记录下visitxxxInsn
1
2
3
4
5
6
visitFieldInsn : 访问某个成员变量的指令,支持GETSTATIC, PUTSTATIC, GETFIELD or PUTFIELD. visitIincInsn : 访问自增指令 visitVarInsn :访问局部变量指令,就是取局部变量变的值放入操作数栈 visitMethodInsn :访问方法指令,就是调用某个方法,支持INVOKEVIRTUAL, INVOKESPECIAL, INVOKESTATIC or INVOKEINTERFACE. visitInsn : 访问无操作数的指令,例如nop,duo等等 visitTypeInsn:访问type指令,即将一个类的全限定名作为参数然后new 一个对象压入操作数栈中
在GI当中我们主要关心visitMethodInsn,顺便说一些相关指令其中invokestatic用来调用静态方法;invokespecial用来调用私有方法,父类方法(super.),类构造器方法;invokeinterface调用接口方法;invokedynamic方法动态执行;invokevirtual调用所有虚方法,即除了以上的方法外全用invokevirtual调用。
分析 下面根据流程分析具体的类当中的操作
MethodDiscovery 这个方法主要是获得类以及方法的信息
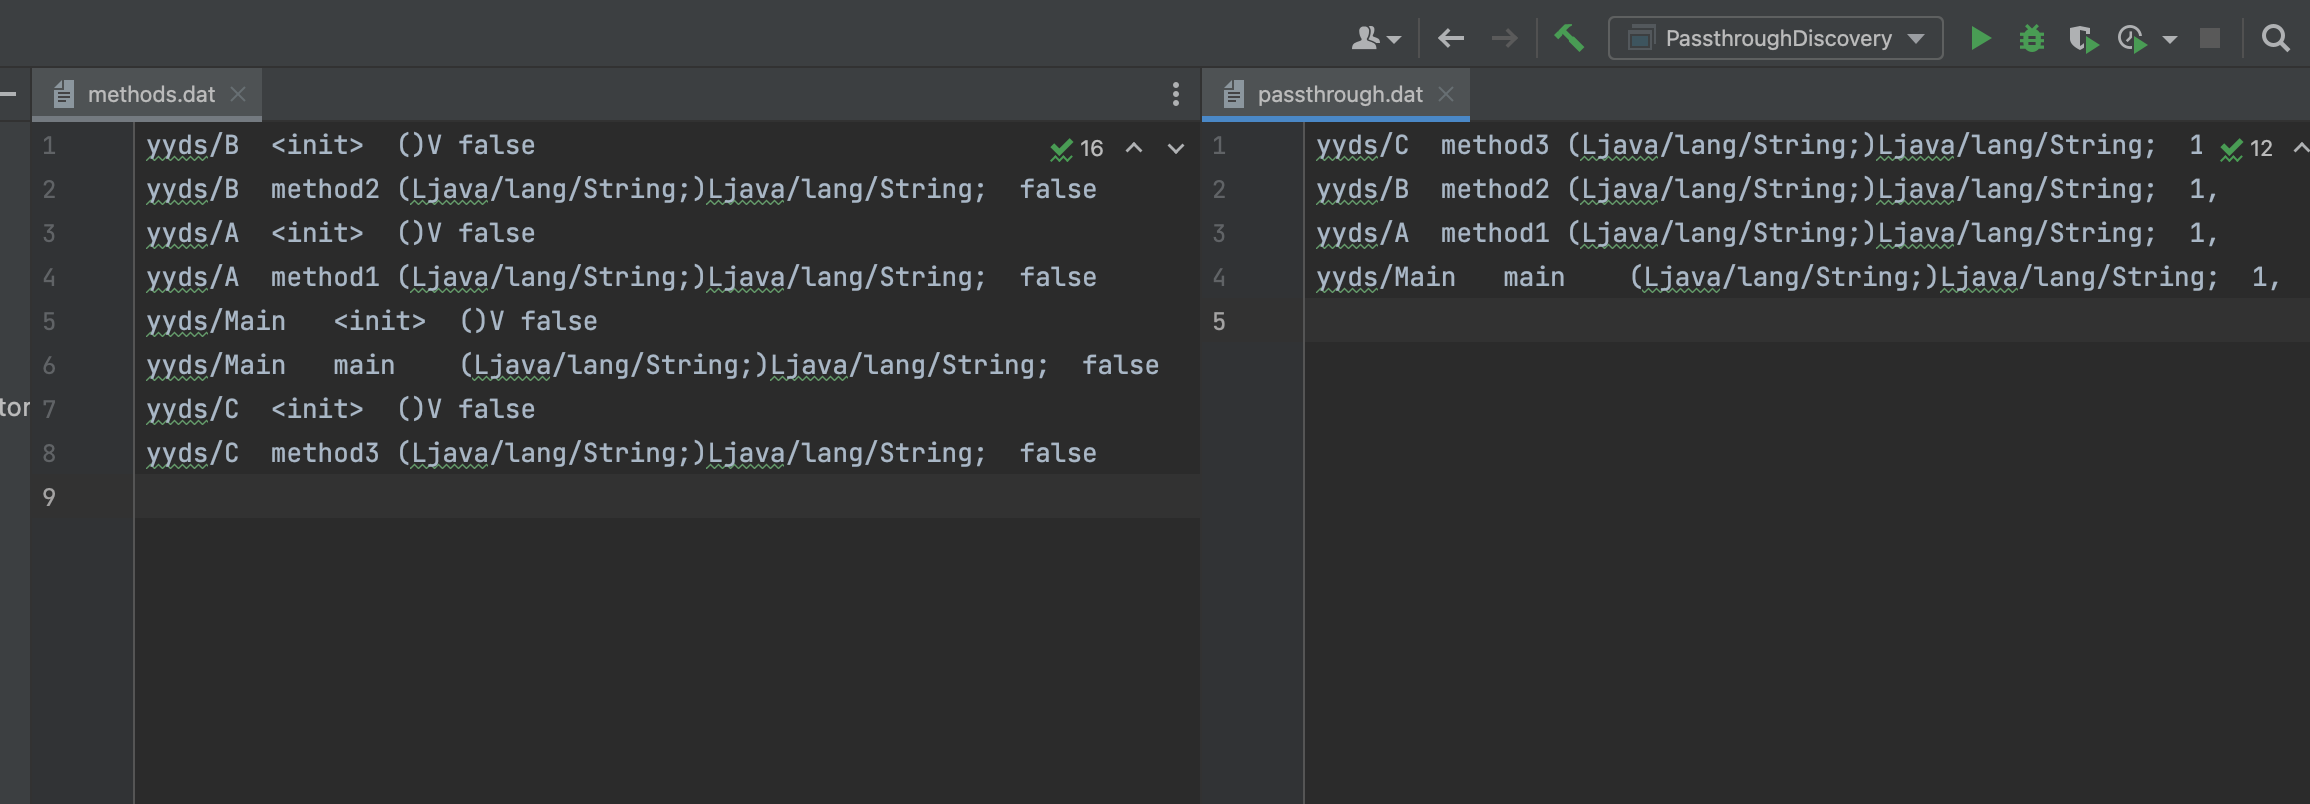
其中在methods.dat里面按照指定格式记录:类名、方法名、参数以及返回值、是否为静态方法
在classes.dat里面按照指定格式记录:类名、父类名、实现的接口名、是否为接口、类的所有字段、注解名
看了下main函数的主体
1
2
3
4
ClassLoader classLoader = Util.getWarClassLoader(Paths.get("/Users/y4tacker/Desktop/test/shorter-0.0.1-SNAPSHOT.jar" )); MethodDiscovery methodDiscovery = new MethodDiscovery(); methodDiscovery.discover(new ClassResourceEnumerator(classLoader)); methodDiscovery.save();
首先第一行的gadgetinspector.Util#getWarClassLoader不是很难不贴代码了,首先创建了一个临时文件夹,通过addShutdownHook在jvm shutdown自动删除,之后将jar/war的文件解压到临时文件夹,并配置/资源文件的路径,并返回URLClassLoader
之后调用gadgetinspector.MethodDiscovery#discover,可以看出通过foreach遍历,之后使用asm的ClassVisitor、MethodVisitor,利用观察模式去扫描所有的class和method并记录
1
2
3
4
5
6
7
8
9
10
11
12
13
14
15
public void discover (final ClassResourceEnumerator classResourceEnumerator) throws Exception for (ClassResourceEnumerator.ClassResource classResource : classResourceEnumerator.getAllClasses()) { try (InputStream in = classResource.getInputStream()) { ClassReader cr = new ClassReader(in); try { cr.accept(new MethodDiscoveryClassVisitor(), ClassReader.EXPAND_FRAMES); } catch (Exception e) { LOGGER.error("Exception analyzing: " + classResource.getName(), e); } } catch (Exception e) { e.printStackTrace(); } } }
调用gadgetinspector.ClassResourceEnumerator#getAllClasses,首先里面调用了*getRuntimeClasses()*函数
可以看到核心代码
1
2
3
4
5
6
7
8
9
10
11
URL stringClassUrl = Object.class.getResource("String.class" ); URLConnection connection = stringClassUrl.openConnection(); Collection<ClassResource> result = new ArrayList<>(); if (connection instanceof JarURLConnection) { URL runtimeUrl = ((JarURLConnection) connection).getJarFileURL(); URLClassLoader classLoader = new URLClassLoader(new URL[]{runtimeUrl}); for (ClassPath.ClassInfo classInfo : ClassPath.from(classLoader).getAllClasses()) { result.add(new ClassLoaderClassResource(classLoader, classInfo.getResourceName())); } }
他先获取JDK内部的String类的路径,加载String类的同时,类加载器还会将rt.jar的全部类一起加载,最后将rt.jar当中的所有类加入到ClassResource类型的result并且返回
之后也就是一个继承了ClassVisitor的MethodDiscoveryClassVisitor分别在visitMethod和visitEnd依次添加方法和类到缓存
之后就是调用save方法保存到文件
1
2
3
4
5
6
7
8
9
10
11
12
13
14
15
16
17
18
19
20
public void save () throws IOException DataLoader.saveData(Paths.get("classes.dat" ), new ClassReference.Factory(), discoveredClasses); DataLoader.saveData(Paths.get("methods.dat" ), new MethodReference.Factory(), discoveredMethods); Map<ClassReference.Handle, ClassReference> classMap = new HashMap<>(); for (ClassReference clazz : discoveredClasses) { classMap.put(clazz.getHandle(), clazz); } InheritanceDeriver.derive(classMap).save(); }
PassthroughDiscovery 这个类用来寻找函数的第几个参数能控制返回值:
0代表this、1-n分别代表第几个函数当中的形参
我们主要来关注gadgetinspector.PassthroughDiscovery#discover,先简单看看逻辑
1
2
3
4
5
6
7
8
9
10
11
12
13
14
15
16
17
18
19
20
21
22
public void discover (final ClassResourceEnumerator classResourceEnumerator, final GIConfig config) throws IOException Map<MethodReference.Handle, MethodReference> methodMap = DataLoader.loadMethods(); Map<ClassReference.Handle, ClassReference> classMap = DataLoader.loadClasses(); InheritanceMap inheritanceMap = InheritanceMap.load(); Map<String, ClassResourceEnumerator.ClassResource> classResourceByName = discoverMethodCalls(classResourceEnumerator); List<MethodReference.Handle> sortedMethods = topologicallySortMethodCalls(); passthroughDataflow = calculatePassthroughDataflow(classResourceByName, classMap, inheritanceMap, sortedMethods, config.getSerializableDecider(methodMap, inheritanceMap)); }
跳过加载文件的部分,我们来看gadgetinspector.PassthroughDiscovery#discoverMethodCalls
1
2
3
4
5
6
7
8
9
10
11
12
13
14
15
16
private Map<String, ClassResourceEnumerator.ClassResource> discoverMethodCalls(final ClassResourceEnumerator classResourceEnumerator) throws IOException { Map<String, ClassResourceEnumerator.ClassResource> classResourcesByName = new HashMap<>(); for (ClassResourceEnumerator.ClassResource classResource : classResourceEnumerator.getAllClasses()) { try (InputStream in = classResource.getInputStream()) { ClassReader cr = new ClassReader(in); try { MethodCallDiscoveryClassVisitor visitor = new MethodCallDiscoveryClassVisitor(Opcodes.ASM6); cr.accept(visitor, ClassReader.EXPAND_FRAMES); classResourcesByName.put(visitor.getName(), classResource); } catch (Exception e) { LOGGER.error("Error analyzing: " + classResource.getName(), e); } } } return classResourcesByName; }
很相似直接跟进MethodCallDiscoveryClassVisitor ,其中重要的是gadgetinspector.PassthroughDiscovery.MethodCallDiscoveryClassVisitor#visitMethod
1
2
3
4
5
6
7
8
9
public MethodVisitor visitMethod (int access, String name, String desc, String signature, String[] exceptions) MethodVisitor mv = super .visitMethod(access, name, desc, signature, exceptions); MethodCallDiscoveryMethodVisitor modelGeneratorMethodVisitor = new MethodCallDiscoveryMethodVisitor( api, mv, this .name, name, desc); return new JSRInlinerAdapter(modelGeneratorMethodVisitor, access, name, desc, signature, exceptions); }
在MethodCallDiscoveryMethodVisitor内重写了MethodCallDiscoveryMethodVisitor的visitMethodInsn方法,也就是在方法内调用其他方法时,会把方法的相关信息缓存到calledMethods
并且这个calledMethods之前在MethodCallDiscoveryMethodVisitor的初始化构造函数当中将calledMethods的引用也放到了类的成员变量methodCalls当中
1
2
3
4
5
6
7
8
public MethodCallDiscoveryMethodVisitor (final int api, final MethodVisitor mv, final String owner, String name, String desc) super (api, mv); this .calledMethods = new HashSet<>(); methodCalls.put(new MethodReference.Handle(new ClassReference.Handle(owner), name, desc), calledMethods); }
接下来就是最重要的逆拓扑排序topologicallySortMethodCalls,这个步骤对于我们之后污点跟踪非常重要,可以看看知道创宇404的文章 非常好,这里为了文章清晰将直接复制相关部分
1
2
3
4
5
6
7
8
9
10
11
12
13
14
15
16
17
18
19
20
21
private List<MethodReference.Handle> topologicallySortMethodCalls() { Map<MethodReference.Handle, Set<MethodReference.Handle>> outgoingReferences = new HashMap<>(); for (Map.Entry<MethodReference.Handle, Set<MethodReference.Handle>> entry : methodCalls.entrySet()) { MethodReference.Handle method = entry.getKey(); outgoingReferences.put(method, new HashSet<>(entry.getValue())); } LOGGER.debug("Performing topological sort..." ); Set<MethodReference.Handle> dfsStack = new HashSet<>(); Set<MethodReference.Handle> visitedNodes = new HashSet<>(); List<MethodReference.Handle> sortedMethods = new ArrayList<>(outgoingReferences.size()); for (MethodReference.Handle root : outgoingReferences.keySet()) { dfsTsort(outgoingReferences, sortedMethods, visitedNodes, dfsStack, root); } LOGGER.debug(String.format("Outgoing references %d, sortedMethods %d" , outgoingReferences.size(), sortedMethods.size())); return sortedMethods; }
在代码当中,首先有三个重要的变量
dfsStack:用来分析方法调用顺序,保证在逆拓扑时候不形成环 visitedNodes:访问过的结点,在一条调用链出现重合的时候,不会造成重复的排序 sortedMethods:最终逆拓扑排序出来的结果 接下来我们详细看看dfsTsort,可以看到是一个递归的过程
1
2
3
4
5
6
7
8
9
10
11
12
13
14
15
16
17
18
19
20
21
22
23
24
25
private static void dfsTsort (Map<MethodReference.Handle, Set<MethodReference.Handle>> outgoingReferences, List<MethodReference.Handle> sortedMethods, Set<MethodReference.Handle> visitedNodes, Set<MethodReference.Handle> stack, MethodReference.Handle node) if (stack.contains(node)) { return ; } if (visitedNodes.contains(node)) { return ; } Set<MethodReference.Handle> outgoingRefs = outgoingReferences.get(node); if (outgoingRefs == null ) { return ; } stack.add(node); for (MethodReference.Handle child : outgoingRefs) { dfsTsort(outgoingReferences, sortedMethods, visitedNodes, stack, child); } stack.remove(node); visitedNodes.add(node); sortedMethods.add(node); }
为了防止在逆拓扑排序形成环,对于待分析的方法,如果在stack里面,则不再入栈了,如果之前已经分析过某方法,也不会再入栈,之后取出被调用的子方法集,遍历这个子方法集递归调用dfsTsort,最后将结果保存到sortedMethods
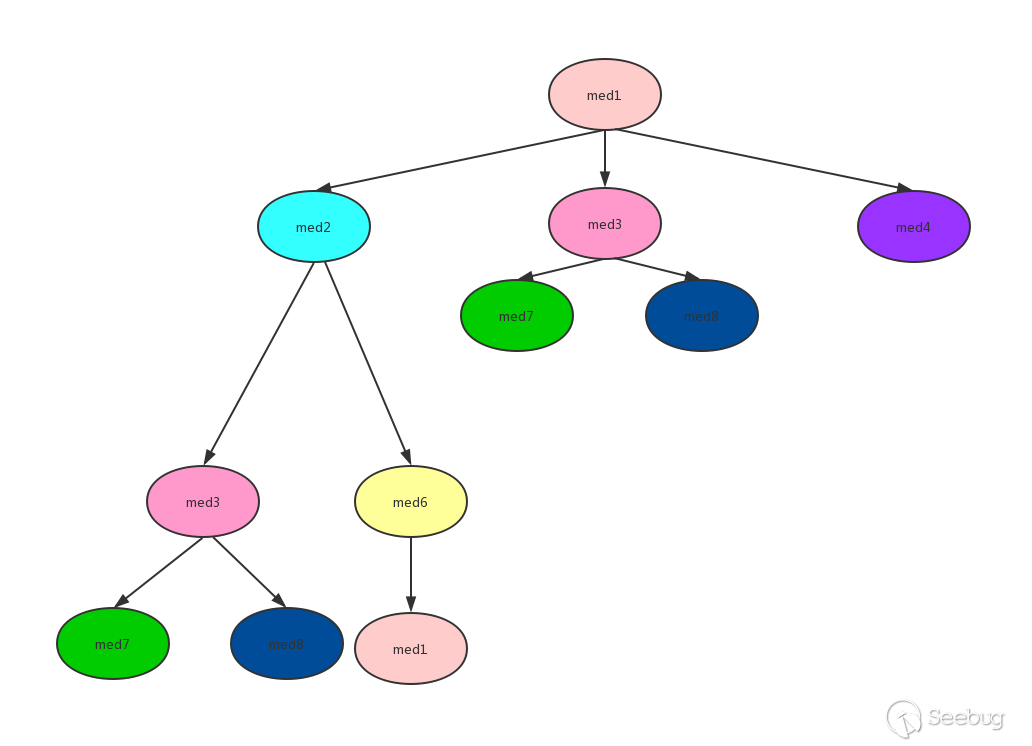
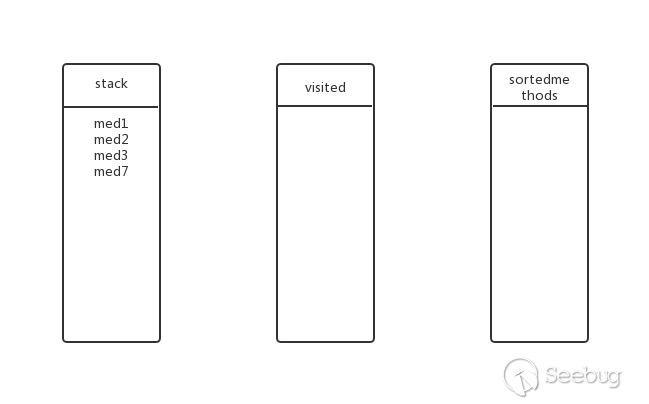
比较形象的过程看创宇里的图,配合理解代码就不难了
对上图进行逆拓扑排序(DFS方式):
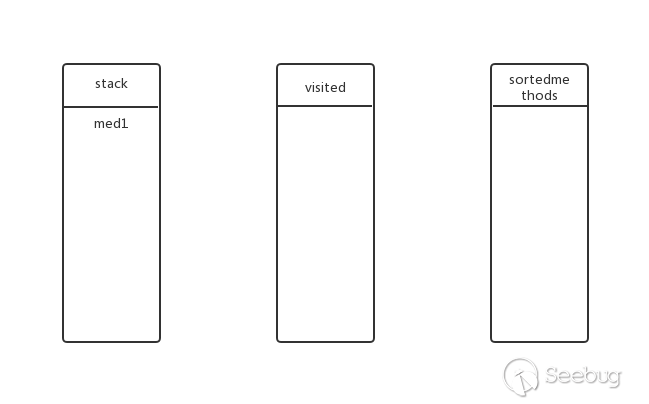
从med1开始,先将med1加入stack中,此时stack、visited、sortedmethods状态如下:
med1还有子方法?有,继续深度遍历。将med2放入stack,此时的状态:
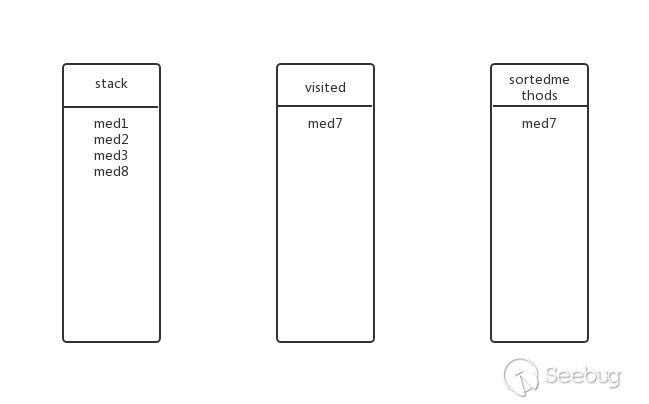
med3有子方法吗?有,继续深度遍历。将med7放入stack,此时的状态:
med7有子方法吗?没有,从stack中弹出med7并加入visited和sortedmethods,此时的状态:
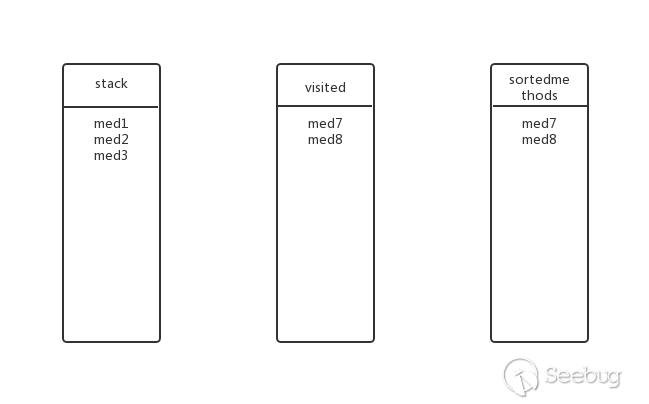
回溯到上一层,med3还有其他子方法吗?有,med8,将med8放入stack,此时的状态:
med8还有子方法吗?没有,弹出stack,加入visited与sortedmethods,此时的状态:
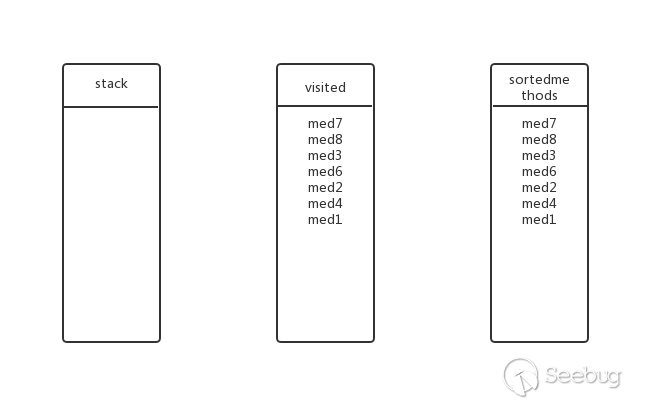
回溯到上一层,med3还有其他子方法吗?没有了,弹出stack,加入visited与sortedmethods,此时的状态:
一直类似上面的过程,得到最终结果:med7、med8、med3、med6、med2、med4、med1
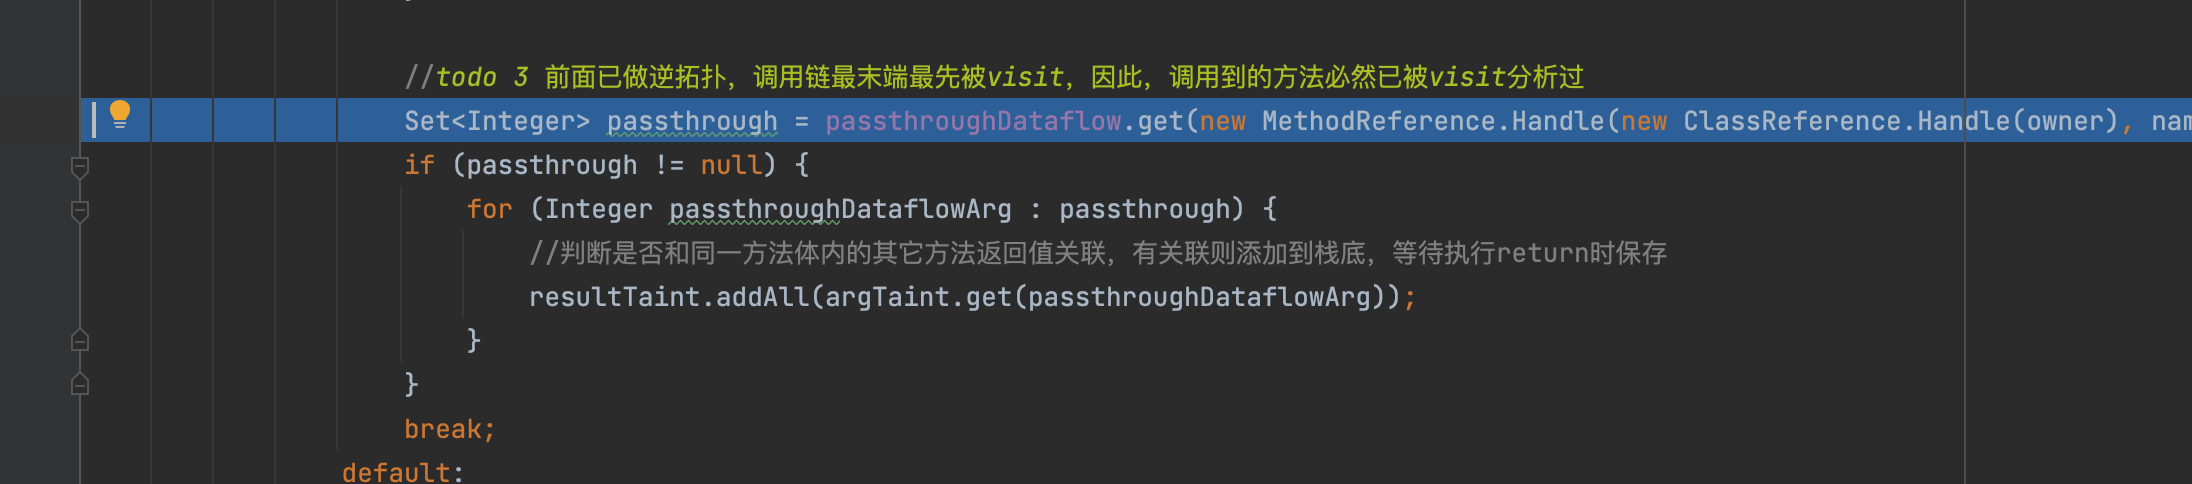
之后的过程就是调用calculatePassthroughDataflow,其中遍历了sortedmethods,并通过字节码分析,生成了方法返回值与参数关系的passthrough数据流(passthroughDataflow主要负责存储参数污染结果,key对应方法名,value对应的是这个方法中可以被污染的参数索引集合),内置了三种反序列化的策略配置config类:JDK、Jackson、Xstream,这里我只分析默认的JDK反序列化,其他过程都是类似的,继续回到正题
,ok还是为了减少干扰,我又在函数逻辑稍作修改,因为上文提到过我们跟踪的代码是
1
2
3
4
5
6
7
8
9
10
11
12
13
14
15
16
17
18
19
20
21
22
23
24
25
26
27
package yyds;import java.io.IOException;public class Main public String main (String args) throws IOException String cmd = new A().method1(args); return new B().method2(cmd); } } class A public String method1 (String param) return param; } } class B public String method2 (String param) return new C().method3(param); } } class C public String method3 (String param) return param; } }
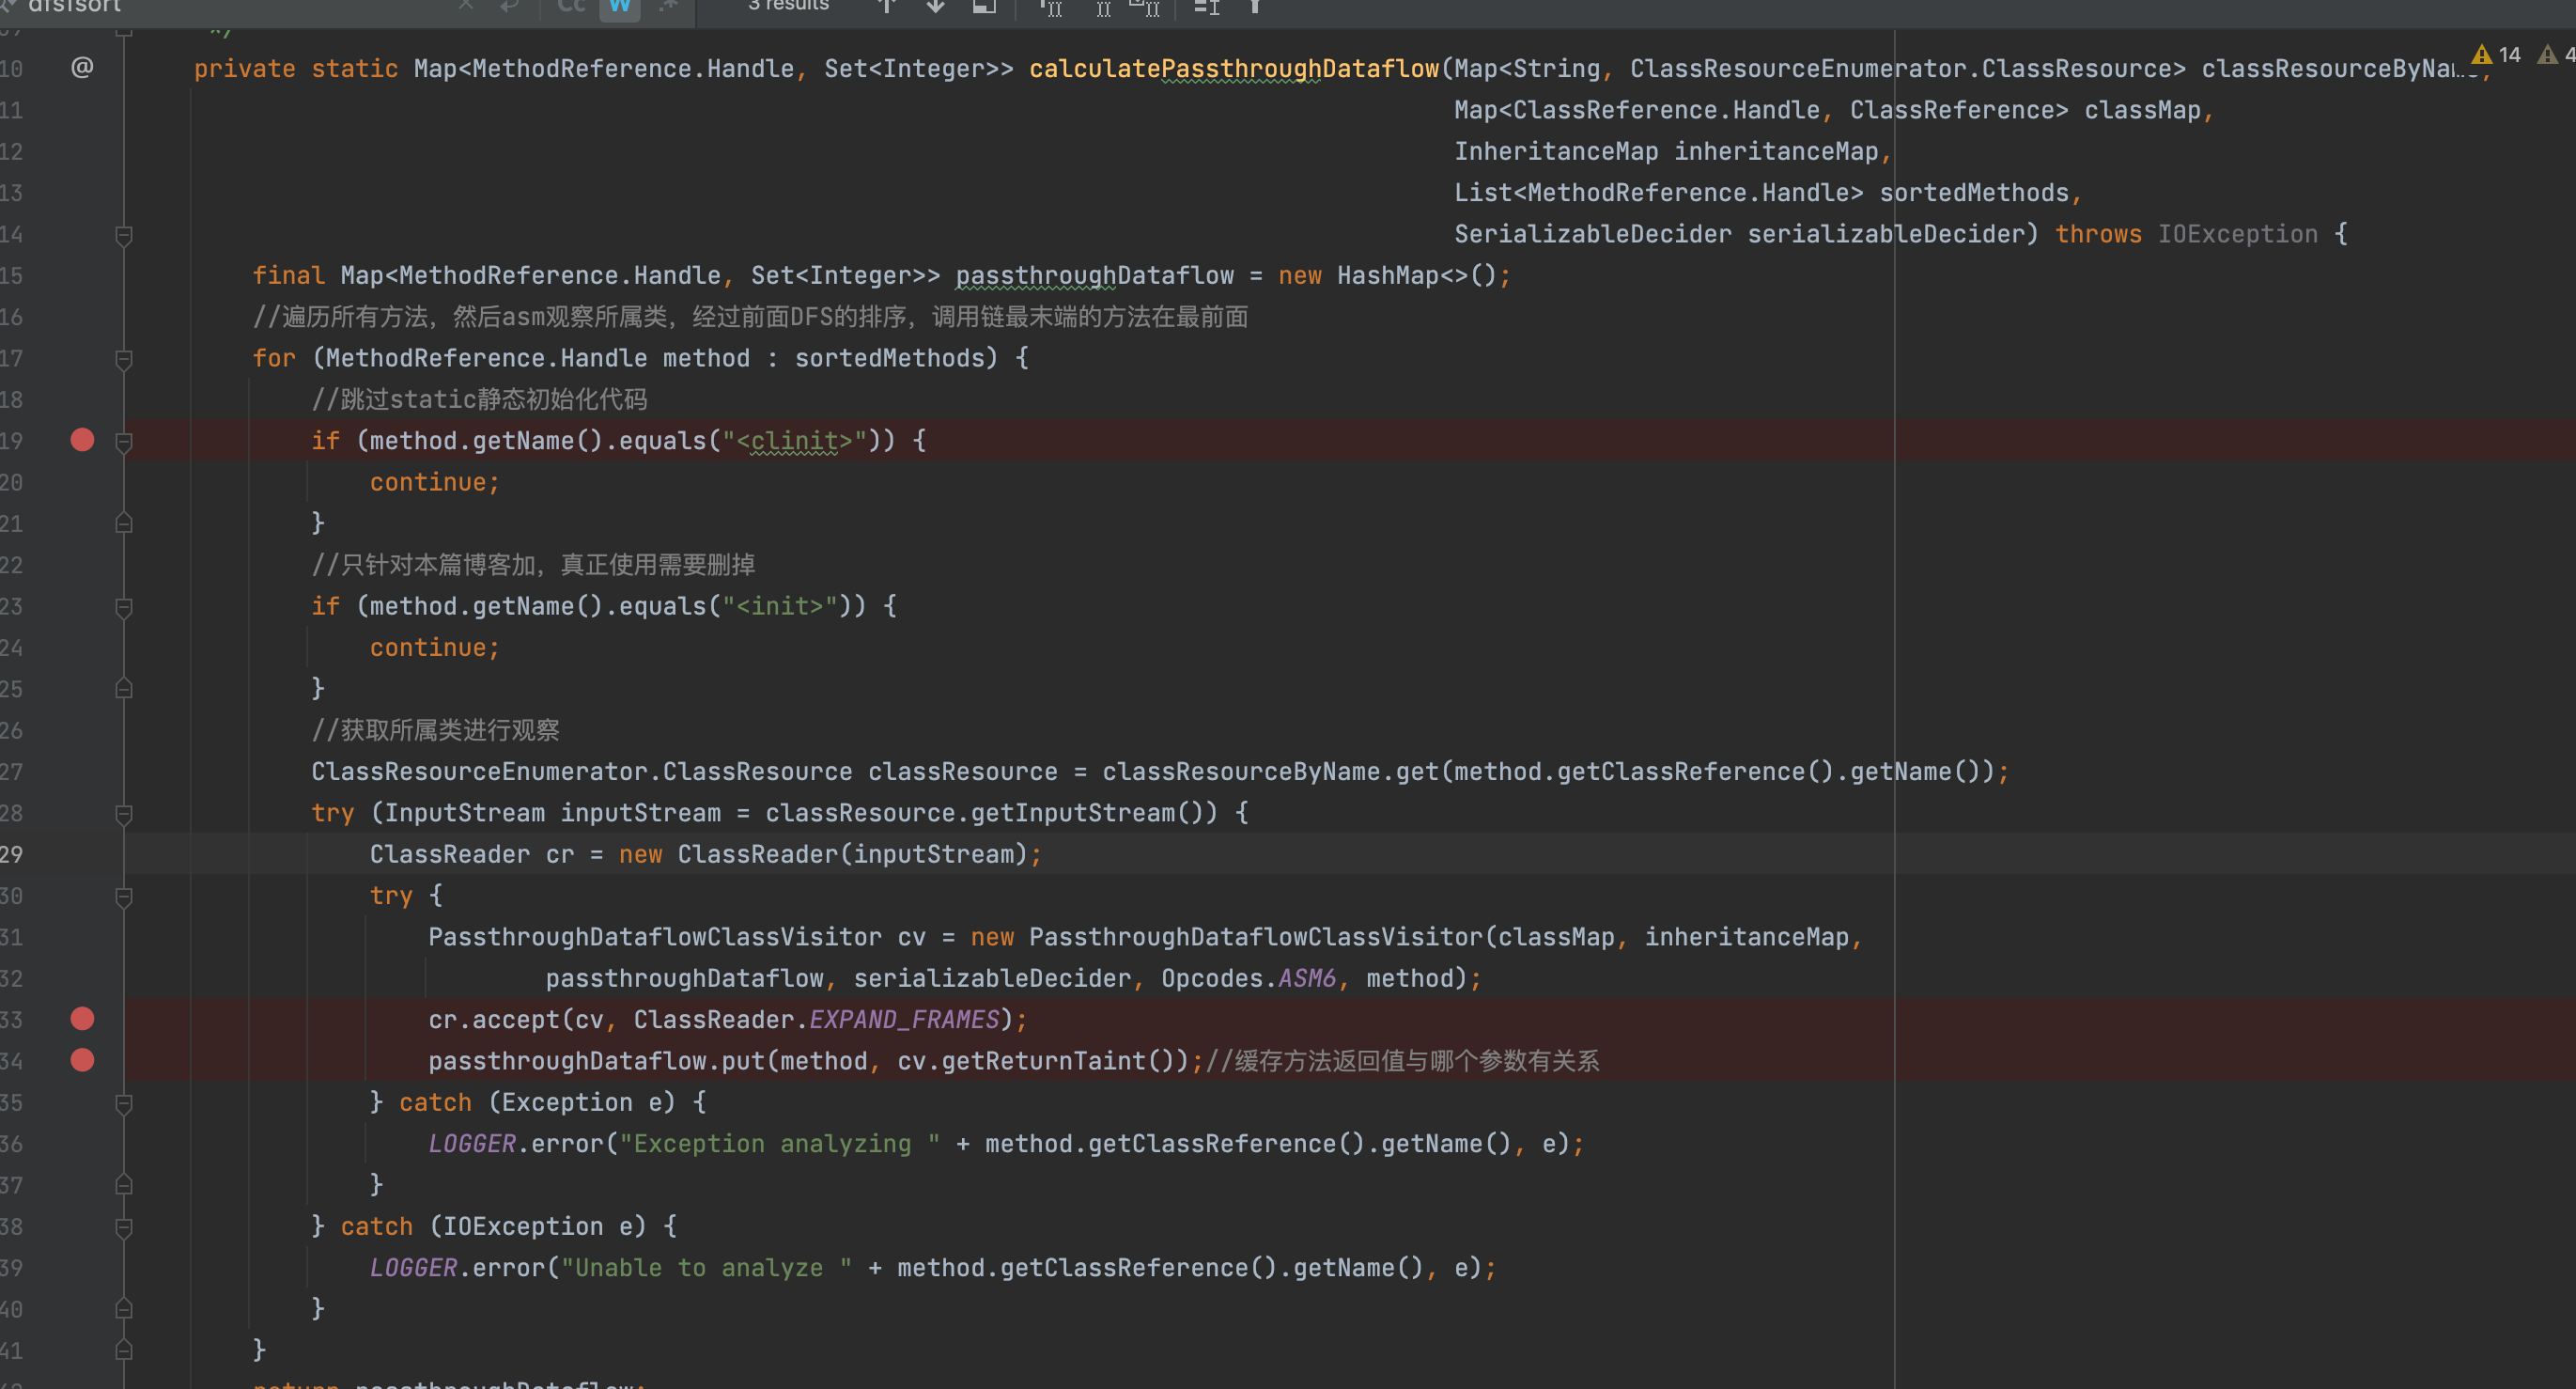
肉眼可得与构造函数无关,接下来我们具体看看函数calculatePassthroughDataflow做了些什么
根据代码逻辑我们可以看出首先会跳过静态初始化代码(因为静态代码块不出意外基本上是没法被污染的)
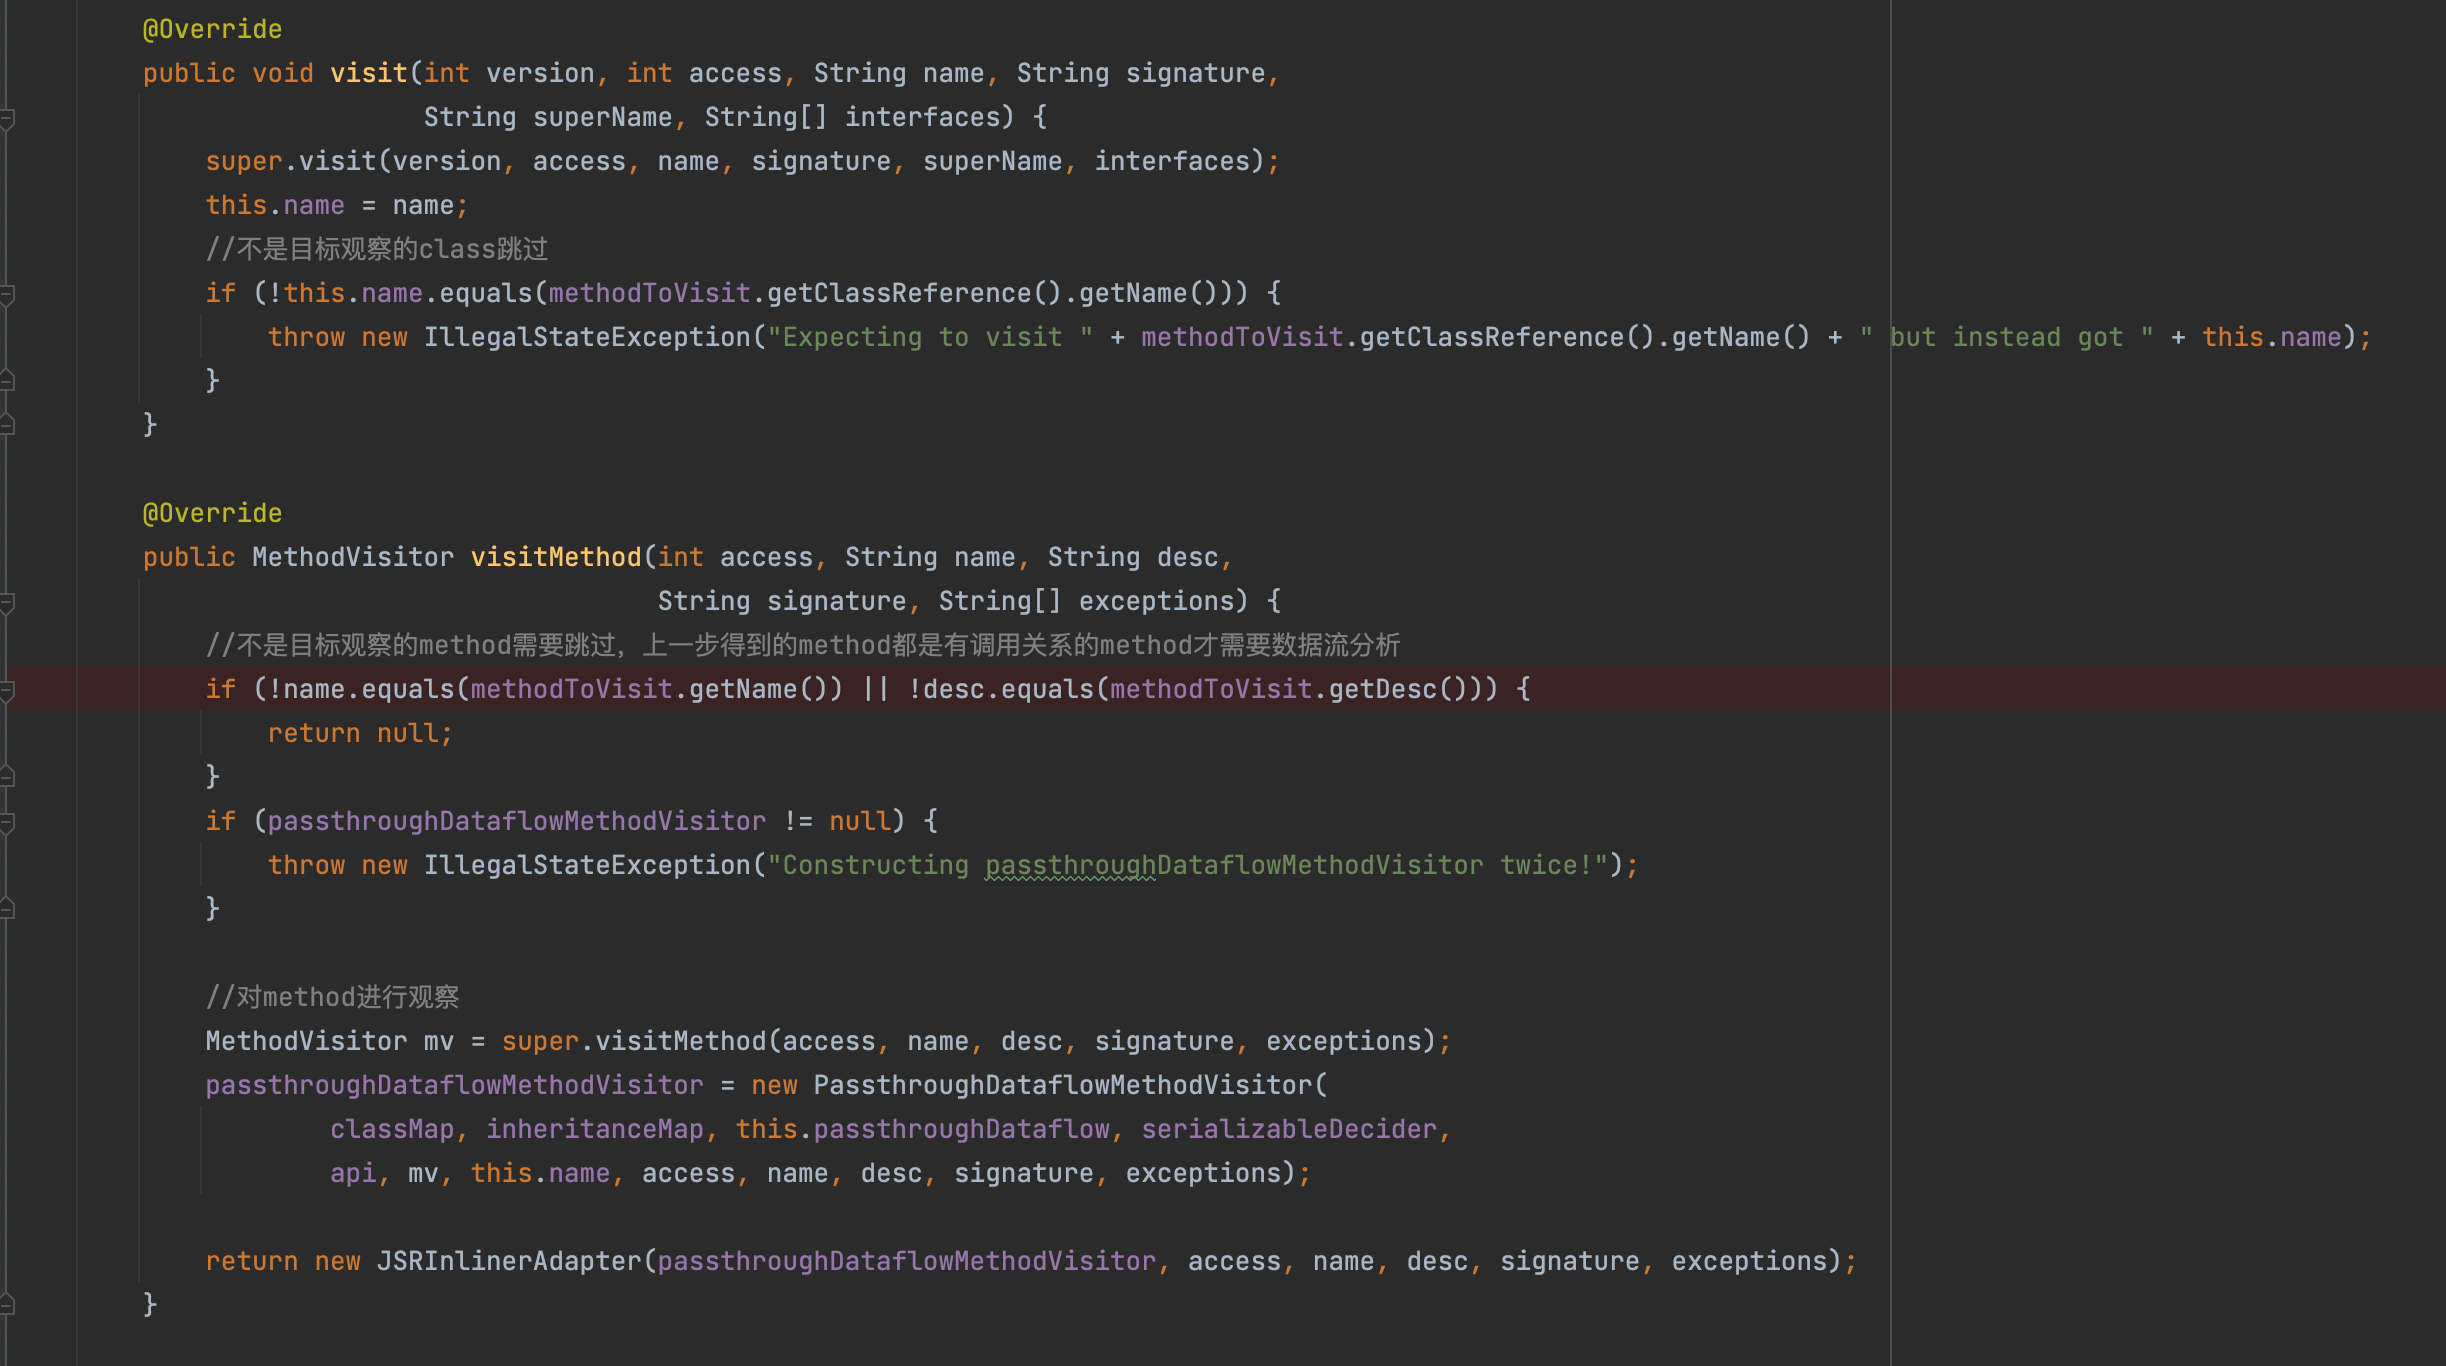
接下来在遍历的每个方法时,会先获取它的所属类,传入函数PassthroughDataflowClassVisitor进行ASM访问者模式的分析,这里我们依然重点关注的是visitMethod函数,这里首先需要目标是需要观察的method,否则跳过
之后会传入PassthroughDataflowMethodVisitor做进一步的处理,在JSRInlinerAdapter的最后执行visitEnd会触发这个观察过程,猜测这样做的目的是便于筛选,便于观察目的类
那么我们来具体看看这个PassthroughDataflowMethodVisitor类,首先它是继承于父类TaintTrackingMethodVisitor,首先是visitCode函数,很简单就是为了模拟本地变量表和操作数栈的变化
1
2
3
4
5
6
7
8
9
10
11
12
13
14
15
16
17
18
19
public void visitCode () super .visitCode(); int localIndex = 0 ; int argIndex = 0 ; if ((this .access & Opcodes.ACC_STATIC) == 0 ) { setLocalTaint(localIndex, argIndex); localIndex += 1 ; argIndex += 1 ; } for (Type argType : Type.getArgumentTypes(desc)) { setLocalTaint(localIndex, argIndex); localIndex += argType.getSize(); argIndex += 1 ; } }
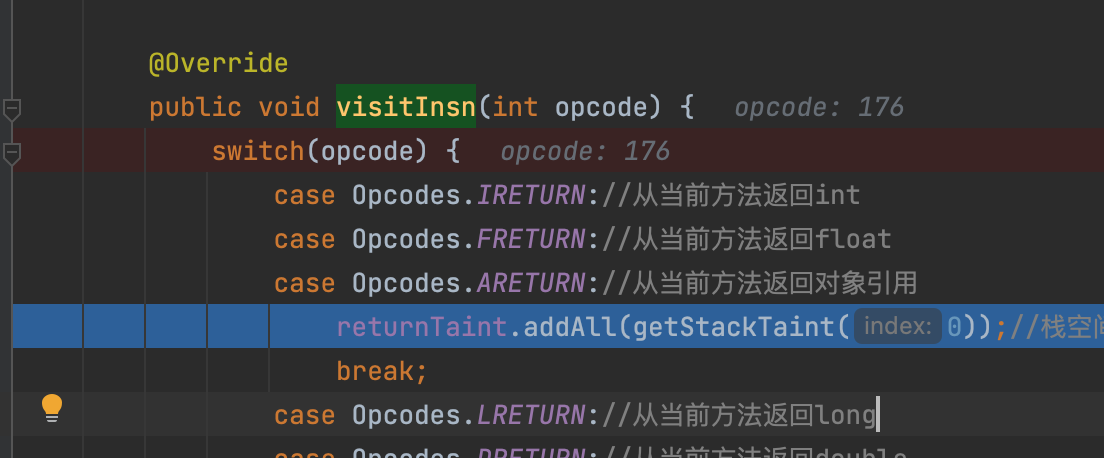
之后的visitInsn方法(每当访问无操作数的指令,例如nop,duo等等,ASM都会调用这个方法,这里我们只需要关注返回值的部分lol)
1
2
3
4
5
6
7
8
9
10
11
12
13
14
15
16
17
18
19
20
@Override public void visitInsn (int opcode) switch (opcode) { case Opcodes.IRETURN: case Opcodes.FRETURN: case Opcodes.ARETURN: returnTaint.addAll(getStackTaint(0 )); break ; case Opcodes.LRETURN: case Opcodes.DRETURN: returnTaint.addAll(getStackTaint(1 )); break ; case Opcodes.RETURN: break ; default : break ; } super .visitInsn(opcode); }
之后还有个重要的就是visitMethodInsn(在方法体内,调用了其他方法,都会触发这个方法的调用),这里逻辑也不难但是为了梳理逻辑这里先不谈,之后我们以开题提到的代码来做讲解
首先可以看到逆拓扑排序的结果以及可被污染的位置,
那么具体跟入这个过程分析
第一步,首先是对C.method3进行观察,节约纸张不废话,首先是到gadgetinspector.PassthroughDiscovery.PassthroughDataflowClassVisitor#visitMethod筛选目标类,之后传入到PassthroughDataflowMethodVisitor当中做进一步的观察,由于method3方法体比较简单,只是返回传入的参数
1
2
3
4
5
class C public String method3 (String param) return param; } }
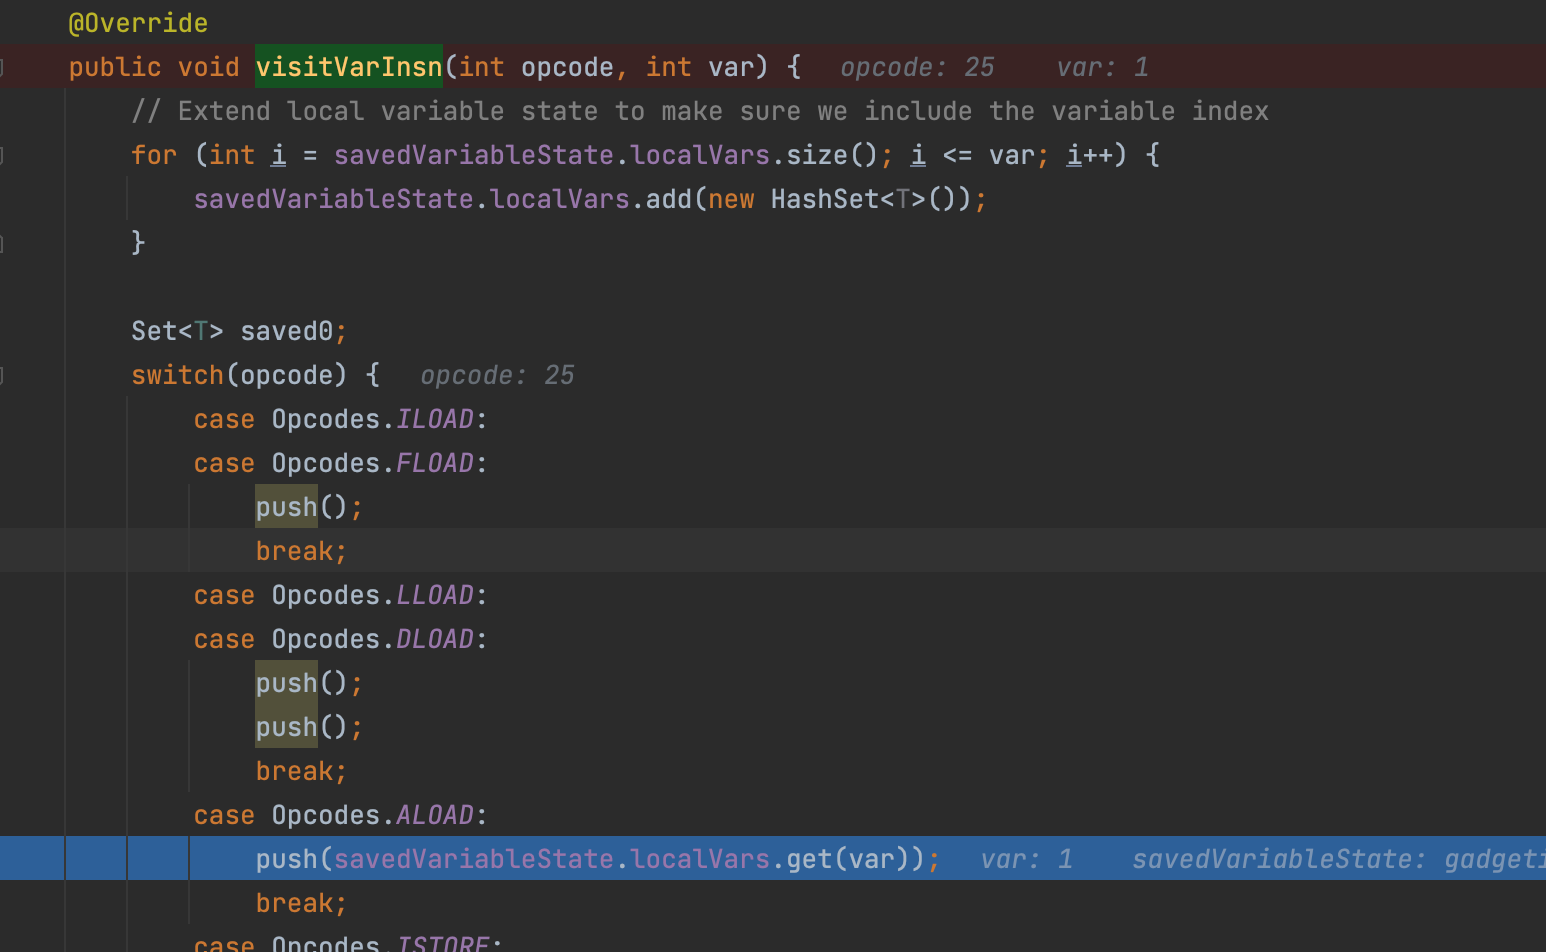
由于在方法体内字节码操作了变量,因此会调用visitVarInsn,也就是在gadgetinspector.TaintTrackingMethodVisitor#visitVarInsn,在这里返回变量触发了aload操作指令,这里会将返回参数对应的本地变量推送至栈顶
之后对应的ARETURN指令会触发调用gadgetinspector.PassthroughDiscovery.PassthroughDataflowMethodVisitor#visitInsn,这里将污染的变量保存到returnTaint变量当中,这里返回long和double的和上面不一样主要是因为它们占两个位置
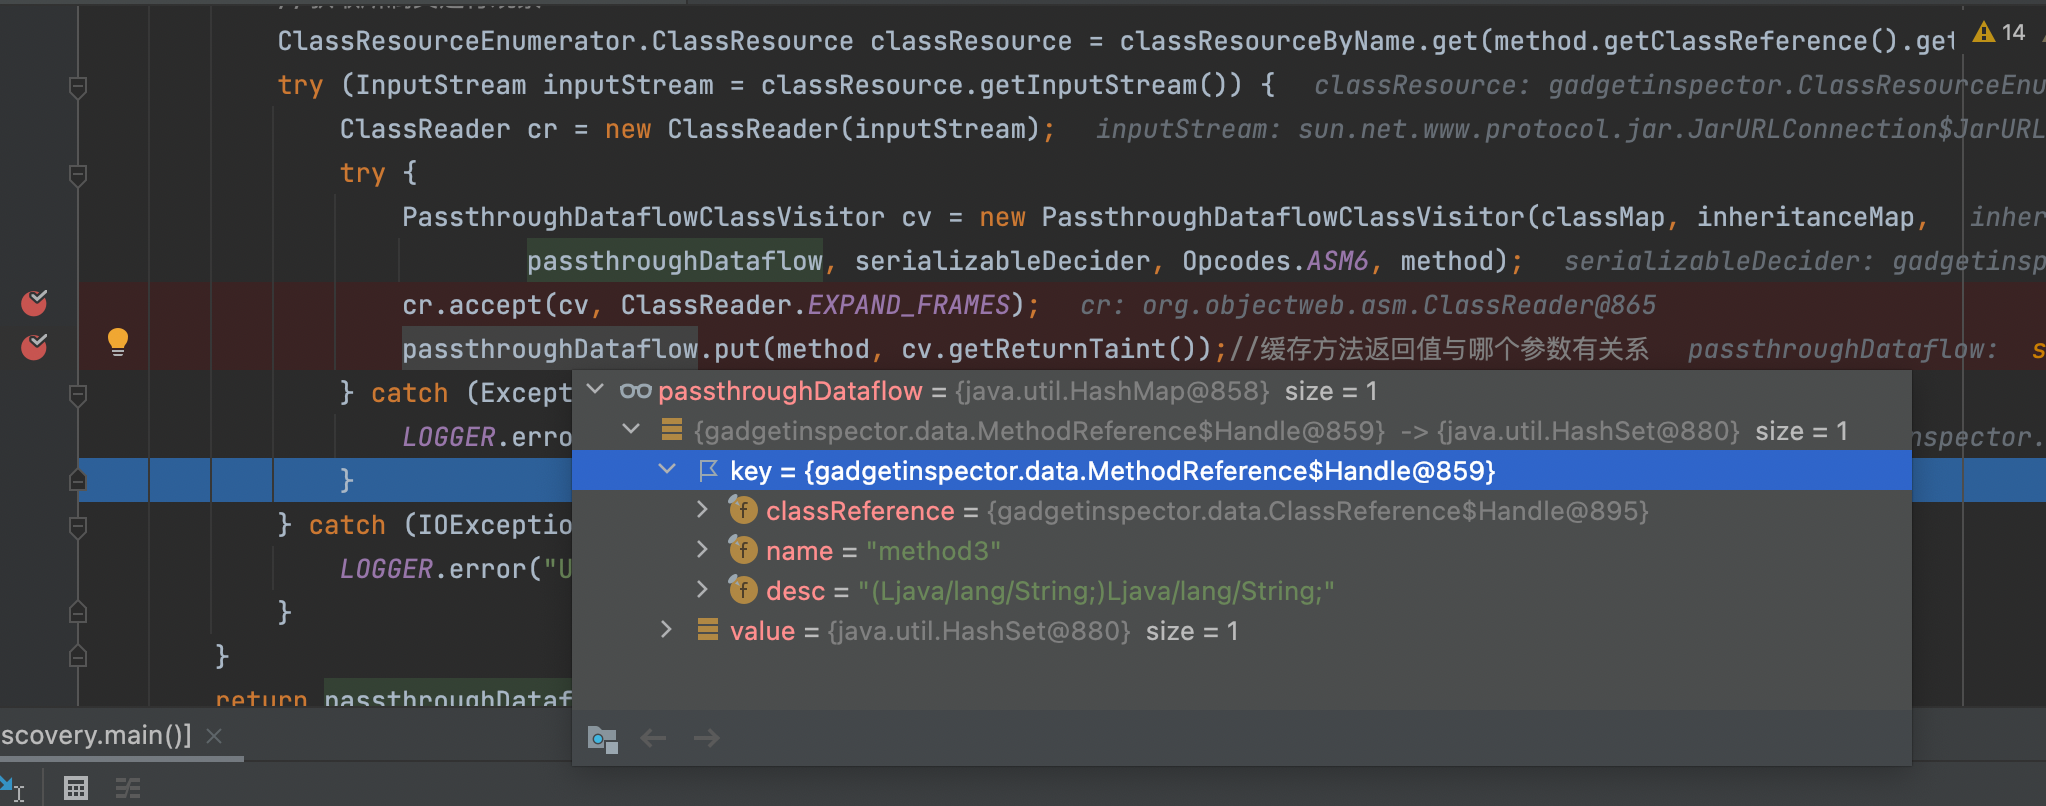
至此我们的第一步method3也就结束了,之后就是将其缓存到passthroughDataflow当中
接下来第二步,也就是调用B.method2方法,这个稍微复杂一点,结合对应的汇编来理解呗
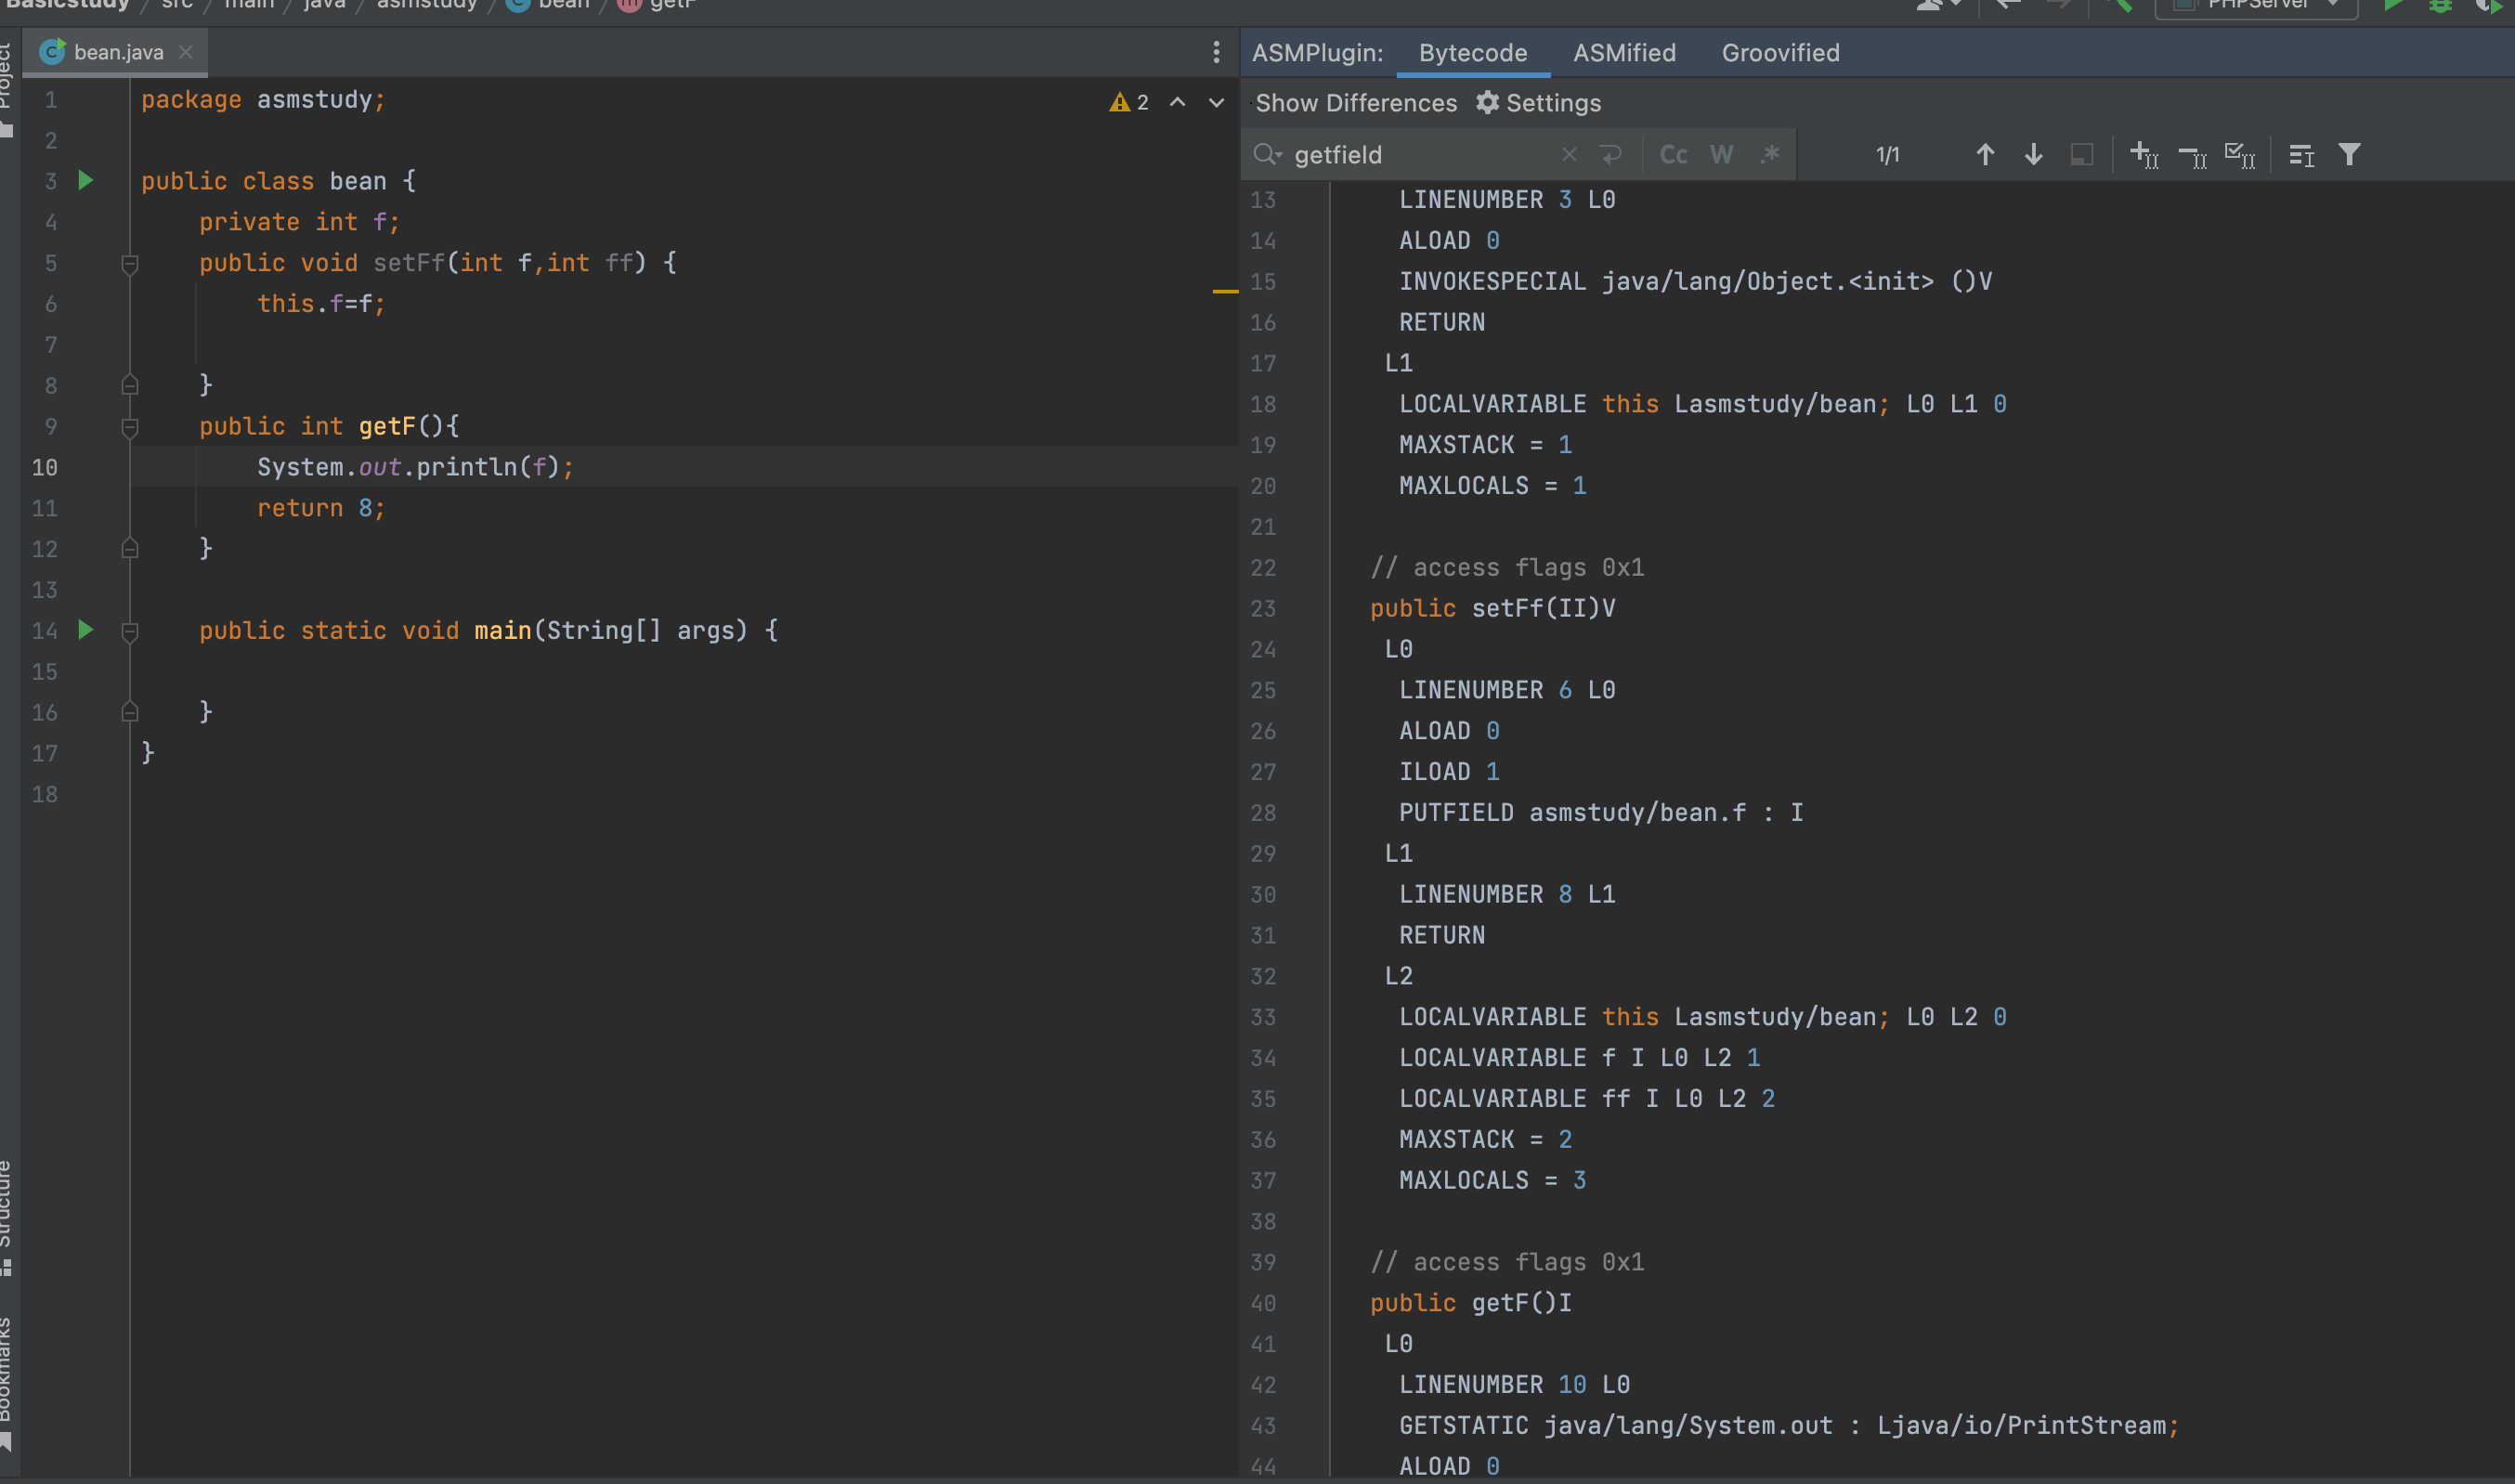
1
2
3
4
5
6
7
8
9
public java.lang.String method2(java.lang.String); Code: 0: new #2 // class yyds/C 3: dup 4: invokespecial #3 // Method yyds/C."<init>":()V 7: aload_1 8: invokevirtual #4 // Method yyds/C.method3:(Ljava/lang/String;)Ljava/lang/String; 11: areturn
跳开第一步new,之后dup会触发gadgetinspector.TaintTrackingMethodVisitor#visitInsn,做的操作也很easy,可能觉得这个很不可思议很难理解,dup指令部分可以拉到最下面看看题外话部分呢
1
2
3
case Opcodes.DUP: push(get(0 )); break ;
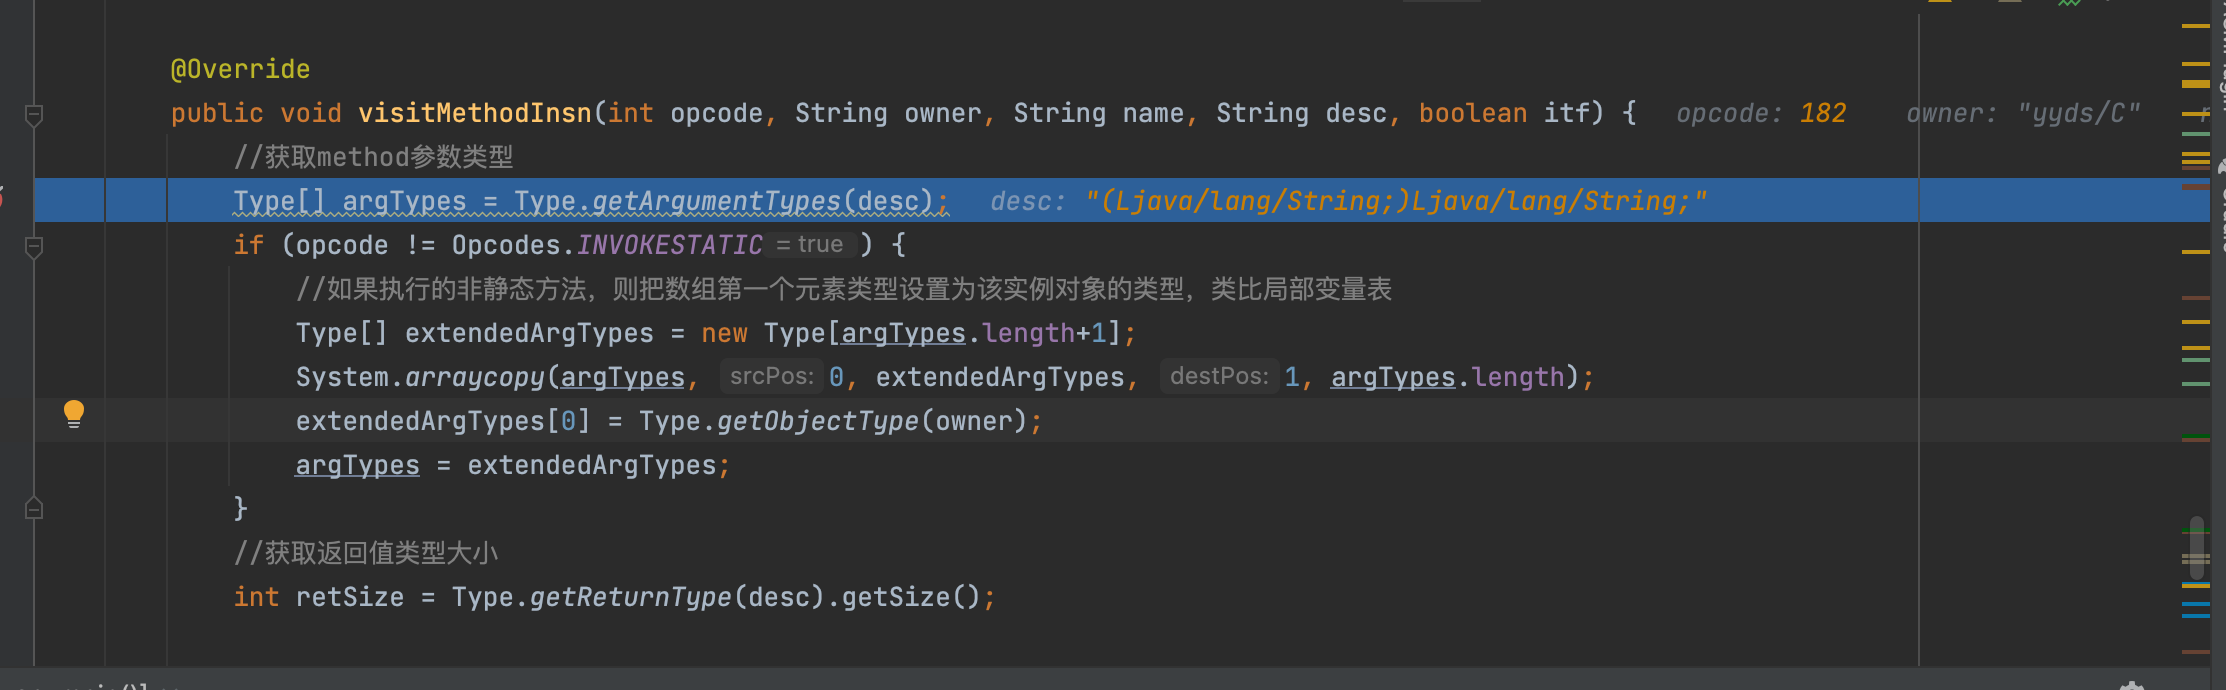
之后INVOKESPECIAL会触发visitMethodInsn,当然肉眼可知实例化C的时候与我们无关没啥好康的,之后又是aload_1去触发visitVarInsn的过程,这里逻辑类似我们第一步讲的那样没啥好说的呗,之后又是invokevirtual触发visitMethodInsn的调用也就是new C().method3()中调用方法3的过程,虽然结合注释也是能看懂的这里也简单说说
首先获取method参数类型,由于是非静态方法会进入if条件
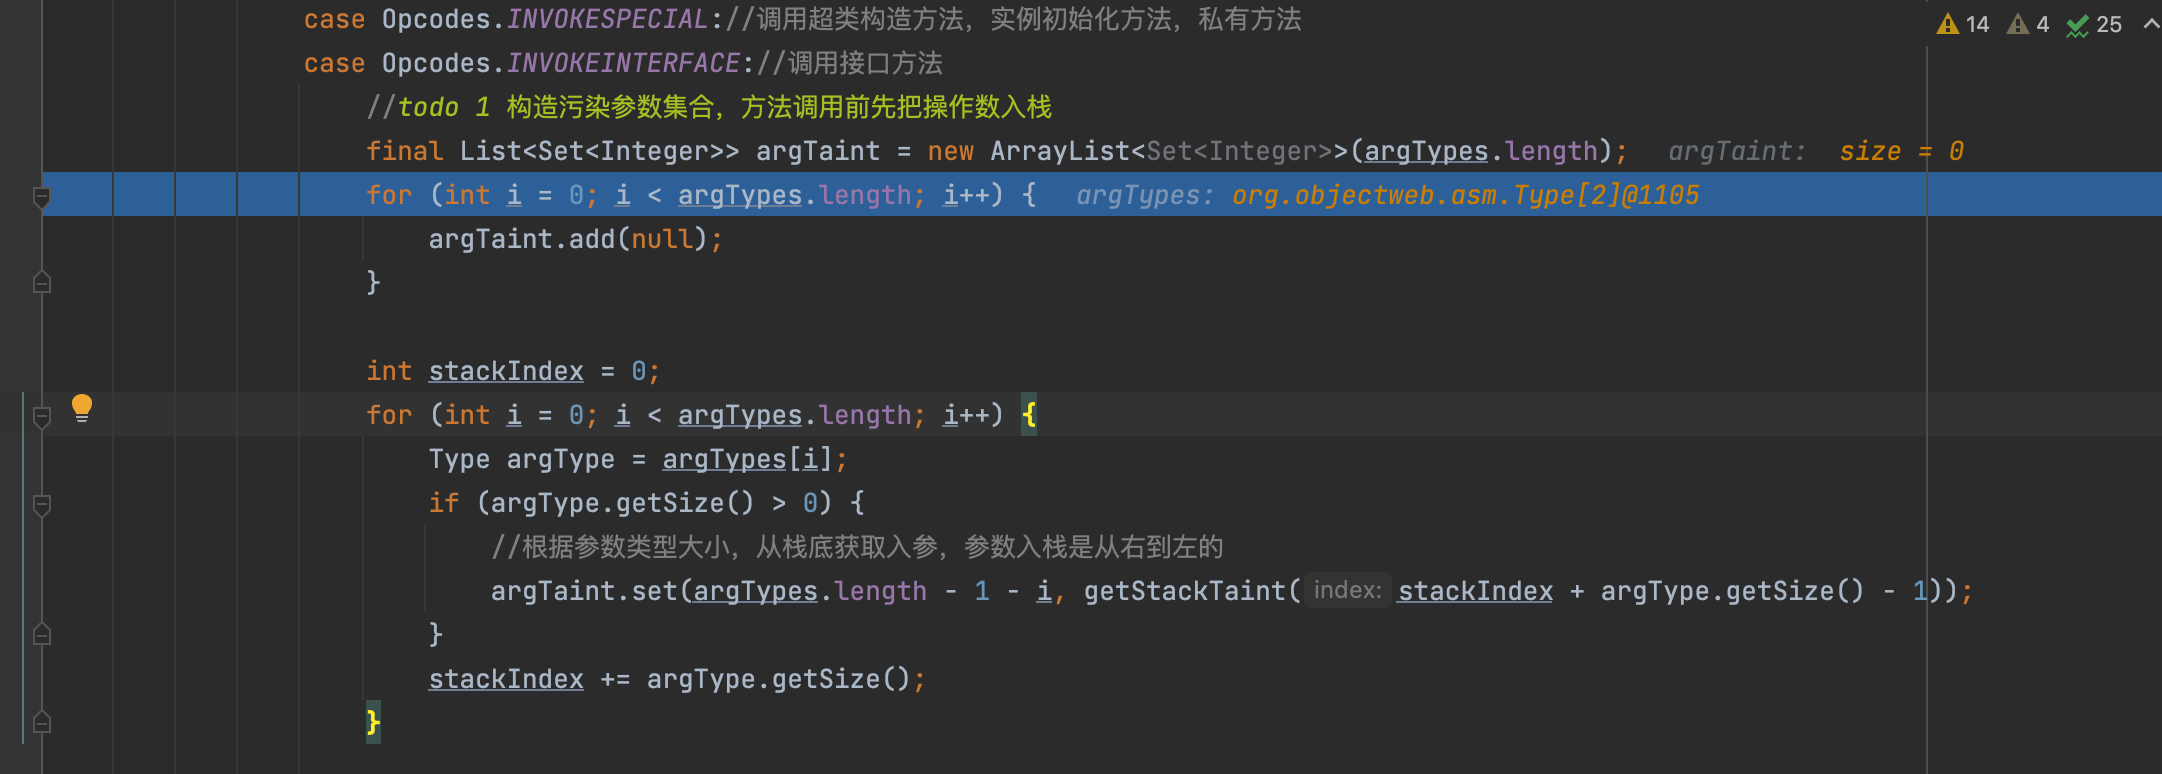
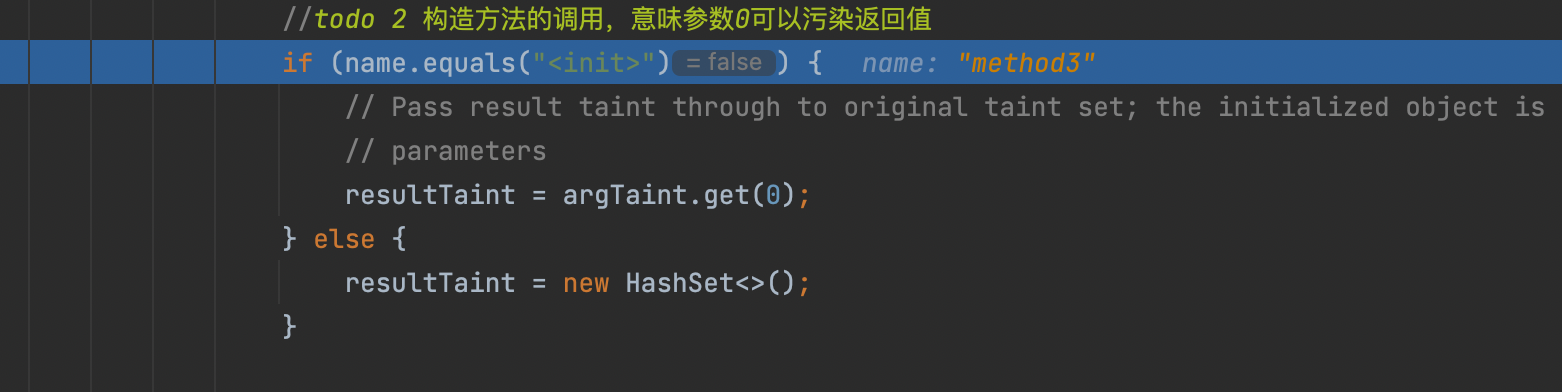
之后构造了污染参数集合,for循环当中根据参数类型大小,从栈底获取入参,参数入栈是从右到左的
由于不是构造函数,会新建一个HashSet用于保存污染参数的返回值
之后判断是否和同一方法体内的其它方法返回值关联,有关联则添加到栈底,等待执行return时保存
至此我们也得到了我们可以污染B.method2,控制返回值
之后A.method1同C.method3就不再重复,最后分析的是main方法的入参args是否会污染到其返回值,也其实差不多,没必要再浪费笔墨了,看看下面反汇编代码即可,有兴趣可以自己更入具体过程看看
1
2
3
4
5
6
7
8
9
10
11
12
13
Code: 0: new #2 // class yyds/A 3: dup 4: invokespecial #3 // Method yyds/A."<init>":()V 7: aload_1 8: invokevirtual #4 // Method yyds/A.method1:(Ljava/lang/String;)Ljava/lang/String; 11: astore_2 12: new #5 // class yyds/B 15: dup 16: invokespecial #6 // Method yyds/B."<init>":()V 19: aload_2 20: invokevirtual #7 // Method yyds/B.method2:(Ljava/lang/String;)Ljava/lang/String; 23: areturn
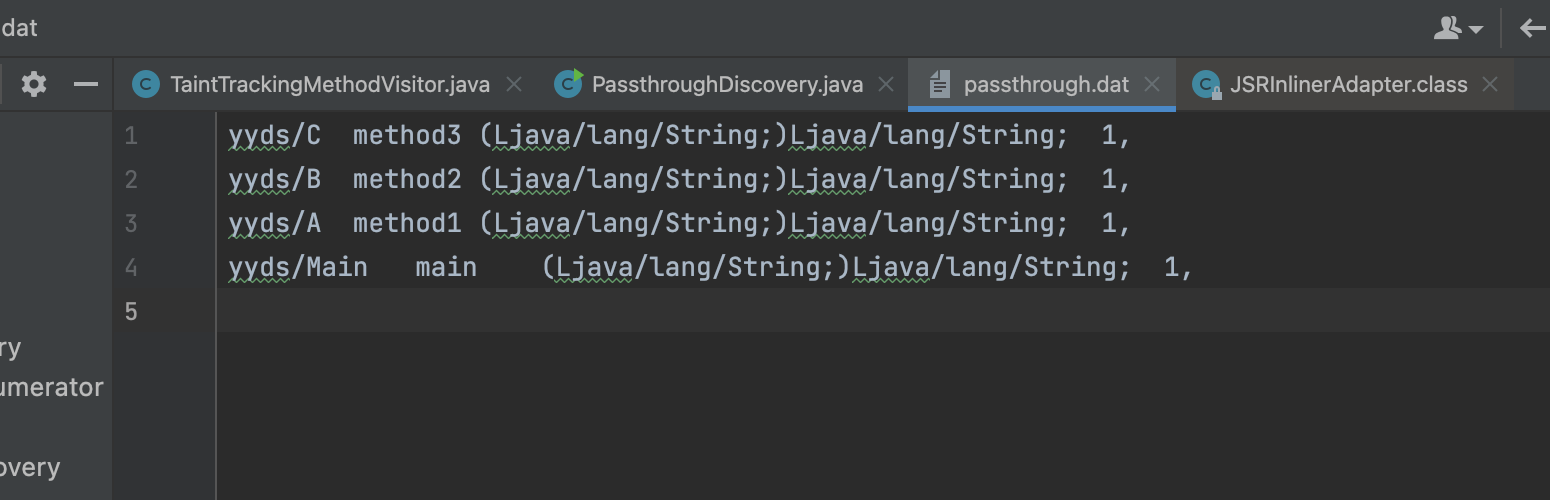
至此我们得到了如下的结果
1 2 3 4 yyds/C method3 (Ljava/lang/String;) Ljava/lang/String ; 1 , yyds/B method2 (Ljava/lang/String;) Ljava/lang/String ; 1 , yyds/A method1 (Ljava/lang/String;) Ljava/lang/String ; 1 , yyds/Main main (Ljava/lang/String;) Ljava/lang/String ; 1 ,
CallGraphDiscovery 这个类主要是为了检查子方法的参数是否可以被父方法的参数所影响
也是从创宇当中的例子开始
1
2
3
4
5
6
7
8
9
private MyObject obj;public void parentMethod (Object arg) ... TestObject obj1 = new TestObject(); Object obj2 = obj1.childMethod1(arg); this .obj.childMethod(obj2); ... }
其中如果没有生成passthrough数据流操作,就无法判断childMethod1的返回值是否会受到参数arg的影响,也就无法继续判断parentMethod的arg参数与子方法MyObject.childmethod的参数传递关系
也是先看原作者的例子以及创宇的师傅的原文帮助理解
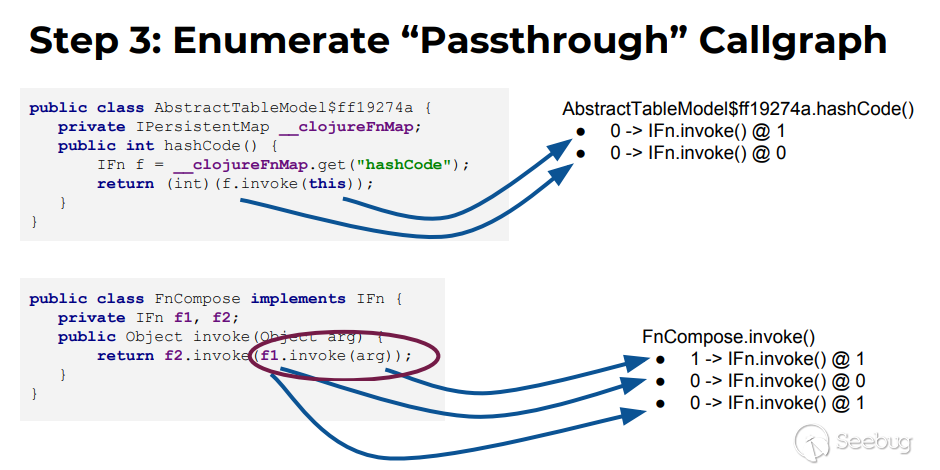
AbstractTableModel$ff19274a.hashcode与子方法IFn.invoke:
AbstractTableModel$ff19274a.hashcode的this(0参)传递给了IFn.invoke的1参,表示为0->IFn.invoke()@1 由于f是通过this.__clojureFnMap(0参)获取的,而f又为IFn.invoke()的this(0参),即AbstractTableModel$ff19274a.hashcode的0参传递给了IFn.invoke的0参,表示为0->IFn.invoke()@0 FnCompose.invoke与子方法IFn.invoke:
FnCompose.invoked的arg(1参)传递给了IFn.invoke的1参,表示为1->IFn.invoke()@1 f1为FnCompose的属性(this,0参),被做为了IFn.invoke的this(0参数)传递,表示为0->IFn.invoke()@1 f1.invoke(arg)做为一个整体被当作1参传递给了IFn.invoke,由于f1在序列化时我们可以控制具体是IFn的哪个实现类,所以具体调用哪个实现类的invoke也相当于能够控制,即f1.invoke(arg)这个整体可以视为0参数传递给了IFn.invoke的1参(这里只是进行的简单猜测,具体实现在字节码分析中,可能也体现了作者说的合理的风险判断吧),表示为0->IFn.invoke()@1 好吧返回正题,来到gadgetinspector.CallGraphDiscovery#discover
会遍历每一个class,并传入ModelGeneratorClassVisitor进行观察,一样的这里加点代码跳过对构造函数的观察
首先是对B类进行观察,还是再列一次反汇编代码
Code:
   0: new           #2                  // class yyds/C
   3: dup
   4: invokespecial #3                  // Method yyds/C."<init>":()V
   7: aload_1
   8: invokevirtual #4                  // Method yyds/C.method3:(Ljava/lang/String;)Ljava/lang/String;
  11: areturn
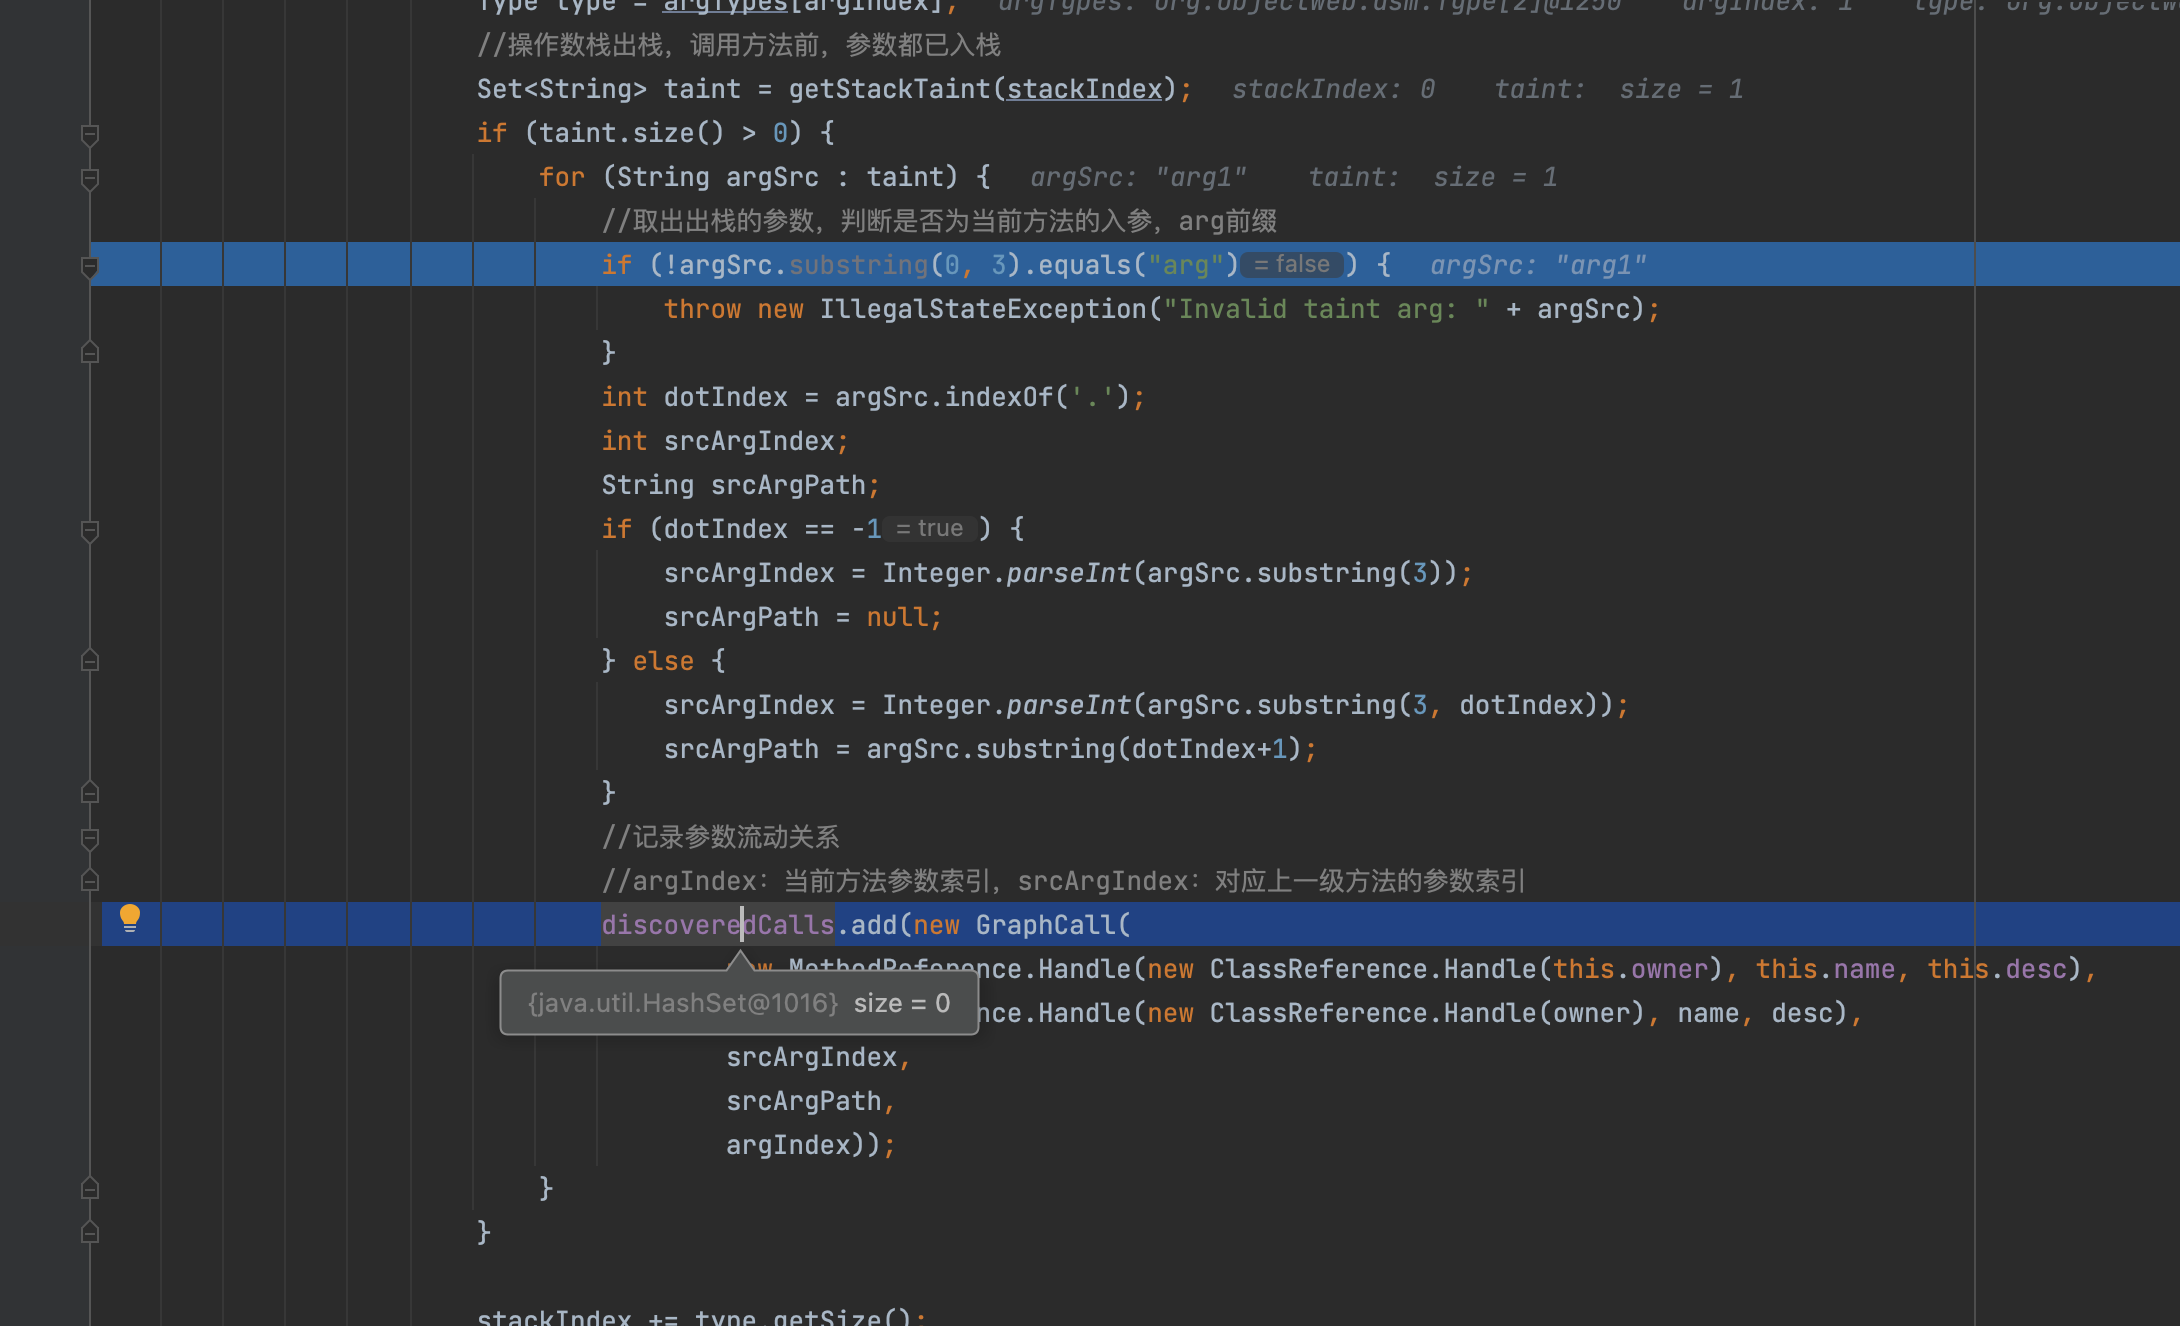
长话短说,万物之源肯定还是visitCode,可以看到对于对于非静态方法会额外多一个arg0,不需要理解,本来Java底层就是这样子处理滴
1
2
3
4
5
6
7
8
9
10
11
12
13
14
15
16
17
18
@Override public void visitCode () super .visitCode(); int localIndex = 0 ; int argIndex = 0 ; if ((this .access & Opcodes.ACC_STATIC) == 0 ) { setLocalTaint(localIndex, "arg" + argIndex); localIndex += 1 ; argIndex += 1 ; } for (Type argType : Type.getArgumentTypes(desc)) { setLocalTaint(localIndex, "arg" + argIndex); localIndex += argType.getSize(); argIndex += 1 ; } }
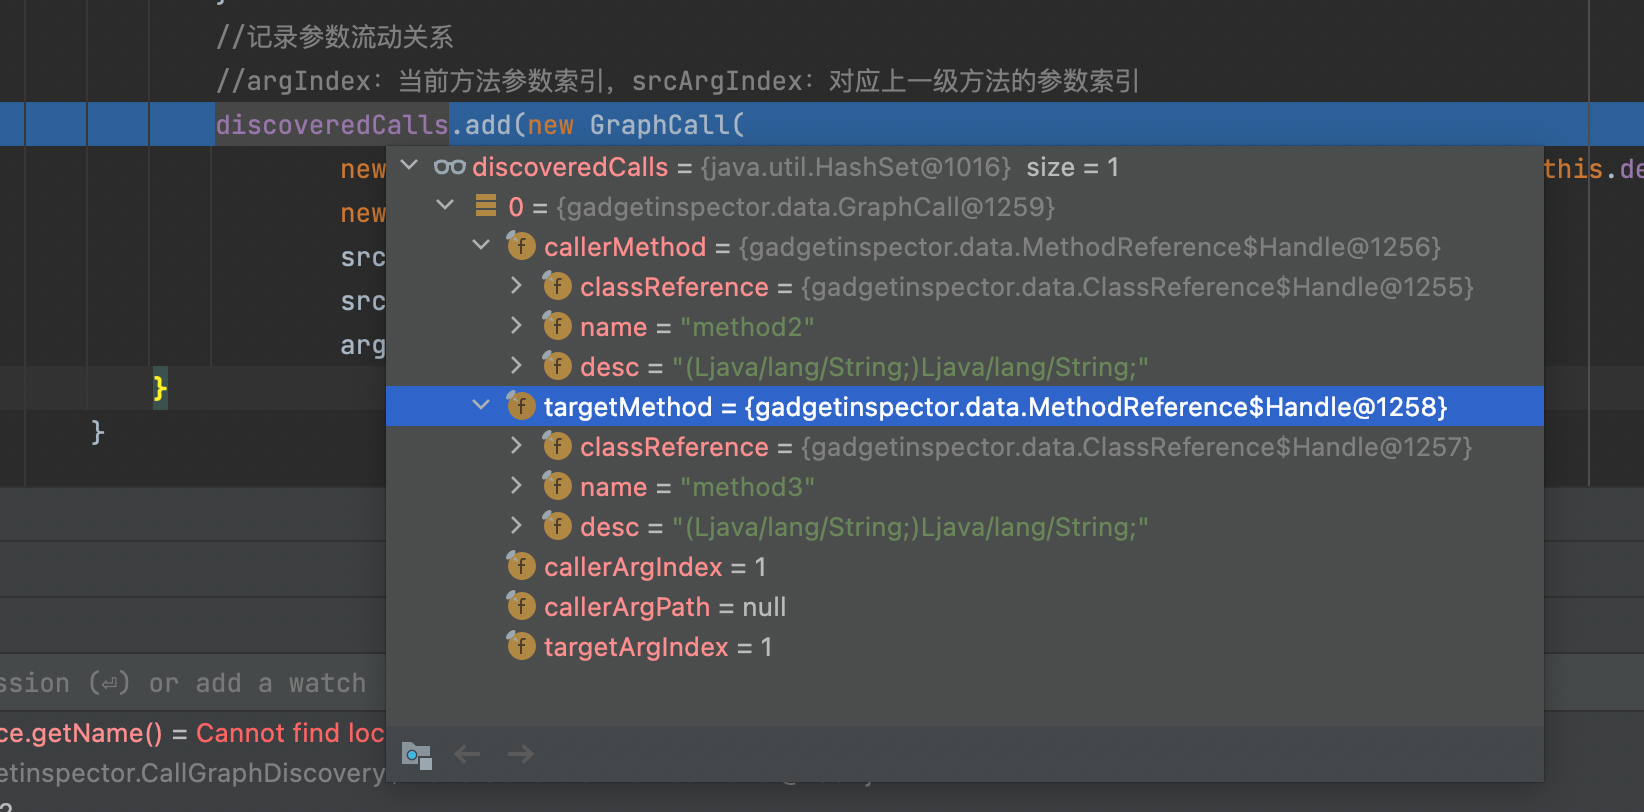
根据汇编由于会调用到invokevirtual,最终会触发gadgetinspector.CallGraphDiscovery.ModelGeneratorMethodVisitor#visitMethodInsn的调用,这里面就会记录最终结果,在代码当中有一些简单的过滤,比如这个arg,就是为了保证参数为当前方法的入参
之后便会在参数discoveredCalls当中记录参数流动关系
当然后面才发现这里还有一个细节的点,我们加强难度,如果代码改为这样,可以看到在上面基础上只是加了个成员变量
1
2
3
4
5
6
7
8
9
10
11
12
13
14
15
16
17
18
19
20
21
22
23
package yyds;import java.io.IOException;public class Test private String name; public static void main (String[] args) } public void main (String args) throws IOException new AA().method1(args, name); } } class AA public String method1 (String param, String param2) return param + param2; } }
看看他的反汇编
1
2
3
4
5
6
7
8
9
10
Code: 0: new #2 // class yyds/AA 3: dup 4: invokespecial #3 // Method yyds/AA."<init>":()V 7: aload_1 8: aload_0 9: getfield #4 // Field name:Ljava/lang/String; 12: invokevirtual #5 // Method yyds/AA.method1:(Ljava/lang/String;Ljava/lang/String;)Ljava/lang/String; 15: pop 16: return
其实和上面分析过程差不多的,唯一多了个区别就是多了个汇编指令getfield的调用,也因此会触发visitFieldInsn,我们具体来看看gadgetinspector.CallGraphDiscovery.ModelGeneratorMethodVisitor#visitFieldInsn,其实就是判断字段是否是transient的,逻辑也很简单,看注释即可
1
2
3
4
5
6
7
8
9
10
11
12
13
14
15
16
17
18
19
20
21
22
23
24
25
26
27
28
29
30
31
32
33
34
35
36
37
38
39
40
41
42
43
44
45
46
47
48
49
50
51
52
public void visitFieldInsn (int opcode, String owner, String name, String desc) switch (opcode) { case Opcodes.GETSTATIC: break ; case Opcodes.PUTSTATIC: break ; case Opcodes.GETFIELD: Type type = Type.getType(desc); if (type.getSize() == 1 ) { Boolean isTransient = null ; if (!couldBeSerialized(serializableDecider, inheritanceMap, new ClassReference.Handle(type.getInternalName()))) { isTransient = Boolean.TRUE; } else { ClassReference clazz = classMap.get(new ClassReference.Handle(owner)); while (clazz != null ) { for (ClassReference.Member member : clazz.getMembers()) { if (member.getName().equals(name)) { isTransient = (member.getModifiers() & Opcodes.ACC_TRANSIENT) != 0 ; break ; } } if (isTransient != null ) { break ; } clazz = classMap.get(new ClassReference.Handle(clazz.getSuperClass())); } } Set<String> newTaint = new HashSet<>(); if (!Boolean.TRUE.equals(isTransient)) { for (String s : getStackTaint(0 )) { newTaint.add(s + "." + name); } } super .visitFieldInsn(opcode, owner, name, desc); setStackTaint(0 , newTaint); return ; } break ; case Opcodes.PUTFIELD: break ; default : throw new IllegalStateException("Unsupported opcode: " + opcode); } super .visitFieldInsn(opcode, owner, name, desc); }
这一部分也算完结了
SourceDiscovery 在gadgetinspector中,存在着多个SourceDiscovery的实现,有jackson的,java原生序列化的等等,我这里主要以jackson的SourceDiscovery实现开始分析
首先在SourceDiscovery抽象类的discover当中,先是加载了所有的类、方法、继承实现关系的数据
1
2
3
4
5
6
7
8
9
10
11
12
13
14
15
16
17
18
19
public void discover () throws IOException Map<ClassReference.Handle, ClassReference> classMap = DataLoader.loadClasses(); Map<MethodReference.Handle, MethodReference> methodMap = DataLoader.loadMethods(); InheritanceMap inheritanceMap = InheritanceMap.load(); Map<MethodReference.Handle, Set<GraphCall>> graphCallMap = new HashMap<>(); for (GraphCall graphCall : DataLoader.loadData(Paths.get("callgraph.dat" ), new GraphCall.Factory())) { MethodReference.Handle caller = graphCall.getCallerMethod(); if (!graphCallMap.containsKey(caller)) { Set<GraphCall> graphCalls = new HashSet<>(); graphCalls.add(graphCall); graphCallMap.put(caller, graphCalls); } else { graphCallMap.get(caller).add(graphCall); } } discover(classMap, methodMap, inheritanceMap, graphCallMap); }
接下来调用discover在实现类gadgetinspector.javaserial.SimpleSourceDiscovery#discover,主要是收集可用的source,逻辑也很简单了
1
2
3
4
5
6
7
8
9
10
11
12
13
14
15
16
17
18
19
20
21
22
23
24
25
26
27
28
29
30
31
32
33
34
35
36
37
38
39
40
41
42
43
44
45
46
47
48
49
50
51
52
53
54
55
56
57
58
59
60
61
62
63
64
public void discover (Map<ClassReference.Handle, ClassReference> classMap, Map<MethodReference.Handle, MethodReference> methodMap, InheritanceMap inheritanceMap) final SerializableDecider serializableDecider = new SimpleSerializableDecider(inheritanceMap); for (MethodReference.Handle method : methodMap.keySet()) { if (Boolean.TRUE.equals(serializableDecider.apply(method.getClassReference()))) { if (method.getName().equals("finalize" ) && method.getDesc().equals("()V" )) { addDiscoveredSource(new Source(method, 0 )); } } } for (MethodReference.Handle method : methodMap.keySet()) { if (Boolean.TRUE.equals(serializableDecider.apply(method.getClassReference()))) { if (method.getName().equals("readObject" ) && method.getDesc().equals("(Ljava/io/ObjectInputStream;)V" )) { addDiscoveredSource(new Source(method, 1 )); } } } for (ClassReference.Handle clazz : classMap.keySet()) { if (Boolean.TRUE.equals(serializableDecider.apply(clazz)) && inheritanceMap.isSubclassOf(clazz, new ClassReference.Handle("java/lang/reflect/InvocationHandler" ))) { MethodReference.Handle method = new MethodReference.Handle( clazz, "invoke" , "(Ljava/lang/Object;Ljava/lang/reflect/Method;[Ljava/lang/Object;)Ljava/lang/Object;" ); addDiscoveredSource(new Source(method, 0 )); } } for (MethodReference.Handle method : methodMap.keySet()) { if (Boolean.TRUE.equals(serializableDecider.apply(method.getClassReference()))) { if (method.getName().equals("hashCode" ) && method.getDesc().equals("()I" )) { addDiscoveredSource(new Source(method, 0 )); } if (method.getName().equals("equals" ) && method.getDesc().equals("(Ljava/lang/Object;)Z" )) { addDiscoveredSource(new Source(method, 0 )); addDiscoveredSource(new Source(method, 1 )); } } } for (MethodReference.Handle method : methodMap.keySet()) { if (Boolean.TRUE.equals(serializableDecider.apply(method.getClassReference())) && inheritanceMap.isSubclassOf(method.getClassReference(), new ClassReference.Handle("groovy/lang/Closure" )) && (method.getName().equals("call" ) || method.getName().equals("doCall" ))) { addDiscoveredSource(new Source(method, 0 )); Type[] methodArgs = Type.getArgumentTypes(method.getDesc()); for (int i = 0 ; i < methodArgs.length; i++) { addDiscoveredSource(new Source(method, i + 1 )); } } } }
GadgetChainDiscovery 接下来就是最重要的生成利用链的部分了,这部分整合了上面所有的信息,会遍历全部的source,并在callgraph.dat中递归查找所有可以继续传递污点参数的子方法调用,直至遇到sink标记的方法,看看discover即可,带了备注
1
2
3
4
5
6
7
8
9
10
11
12
13
14
15
16
17
18
19
20
21
22
23
24
25
26
27
28
29
30
31
32
33
34
35
36
37
38
39
40
41
42
43
44
45
46
47
48
49
50
51
52
53
54
55
56
57
58
59
60
61
62
63
64
65
66
67
68
69
70
71
72
73
74
75
76
77
78
79
80
81
82
83
84
85
86
87
88
89
90
91
92
93
94
95
96
97
98
99
100
101
102
103
104
105
106
107
108
public void discover () throws Exception Map<MethodReference.Handle, MethodReference> methodMap = DataLoader.loadMethods(); InheritanceMap inheritanceMap = InheritanceMap.load(); Map<MethodReference.Handle, Set<MethodReference.Handle>> methodImplMap = InheritanceDeriver.getAllMethodImplementations( inheritanceMap, methodMap); final ImplementationFinder implementationFinder = config.getImplementationFinder( methodMap, methodImplMap, inheritanceMap); try (Writer writer = Files.newBufferedWriter(Paths.get("methodimpl.dat" ))) { for (Map.Entry<MethodReference.Handle, Set<MethodReference.Handle>> entry : methodImplMap.entrySet()) { writer.write(entry.getKey().getClassReference().getName()); writer.write("\t" ); writer.write(entry.getKey().getName()); writer.write("\t" ); writer.write(entry.getKey().getDesc()); writer.write("\n" ); for (MethodReference.Handle method : entry.getValue()) { writer.write("\t" ); writer.write(method.getClassReference().getName()); writer.write("\t" ); writer.write(method.getName()); writer.write("\t" ); writer.write(method.getDesc()); writer.write("\n" ); } } } Map<MethodReference.Handle, Set<GraphCall>> graphCallMap = new HashMap<>(); for (GraphCall graphCall : DataLoader.loadData(Paths.get("callgraph.dat" ), new GraphCall.Factory())) { MethodReference.Handle caller = graphCall.getCallerMethod(); if (!graphCallMap.containsKey(caller)) { Set<GraphCall> graphCalls = new HashSet<>(); graphCalls.add(graphCall); graphCallMap.put(caller, graphCalls); } else { graphCallMap.get(caller).add(graphCall); } } Set<GadgetChainLink> exploredMethods = new HashSet<>(); LinkedList<GadgetChain> methodsToExplore = new LinkedList<>(); for (Source source : DataLoader.loadData(Paths.get("sources.dat" ), new Source.Factory())) { GadgetChainLink srcLink = new GadgetChainLink(source.getSourceMethod(), source.getTaintedArgIndex()); if (exploredMethods.contains(srcLink)) { continue ; } methodsToExplore.add(new GadgetChain(Arrays.asList(srcLink))); exploredMethods.add(srcLink); } long iteration = 0 ; Set<GadgetChain> discoveredGadgets = new HashSet<>(); while (methodsToExplore.size() > 0 ) { if ((iteration % 1000 ) == 0 ) { LOGGER.info("Iteration " + iteration + ", Search space: " + methodsToExplore.size()); } iteration += 1 ; GadgetChain chain = methodsToExplore.pop(); GadgetChainLink lastLink = chain.links.get(chain.links.size()-1 ); Set<GraphCall> methodCalls = graphCallMap.get(lastLink.method); if (methodCalls != null ) { for (GraphCall graphCall : methodCalls) { if (graphCall.getCallerArgIndex() != lastLink.taintedArgIndex) { continue ; } Set<MethodReference.Handle> allImpls = implementationFinder.getImplementations(graphCall.getTargetMethod()); for (MethodReference.Handle methodImpl : allImpls) { GadgetChainLink newLink = new GadgetChainLink(methodImpl, graphCall.getTargetArgIndex()); if (exploredMethods.contains(newLink)) { continue ; } GadgetChain newChain = new GadgetChain(chain, newLink); if (isSink(methodImpl, graphCall.getTargetArgIndex(), inheritanceMap)) { discoveredGadgets.add(newChain); } else { methodsToExplore.add(newChain); exploredMethods.add(newLink); } } } } } try (OutputStream outputStream = Files.newOutputStream(Paths.get("gadget-chains.txt" )); Writer writer = new OutputStreamWriter(outputStream, StandardCharsets.UTF_8)) { for (GadgetChain chain : discoveredGadgets) { printGadgetChain(writer, chain); } } System.out.println(Paths.get("gadget-chains.txt" )); LOGGER.info("Found {} gadget chains." , discoveredGadgets.size()); }
到这里GI的关键逻辑也走完了难点部分也结束了
题外话 关于dup指令 这里我非常好奇java虚拟机里的dup指令的作用,看官方描述是复制栈顶数值并将复制值压入栈顶,很懵逼,但看了脚本之家的例子 后就完全明白了
对于类
1
2
3
4
5
6
7
8
public class ExceptionTest void cantBeZero (int i) throws Exception throw new Exception(); } }
得到字节码如下
1
2
3
4
5
6
7
8
9
0: iload_1 1: ifne 12 4: new #2 // class java/lang/Exception 7: dup 8: invokespecial #3 // Method java/lang/Exception."<init>":()V 11: athrow 12: return
其中new指令在java堆上为Exception对象分配内存空间,并将地址压入操作数栈顶;
然后dup指令为复制操作数栈顶值,并将其压入栈顶,也就是说此时操作数栈上有连续相同的两个对象地址;
invokespecial指令调用实例初始化方法:()V,注意这个方法是一个实例方法,所以需要从操作数栈顶弹出一个this引用,也就是说这一步会弹出一个之前入栈的对象地址;
athrow指令从操作数栈顶取出一个引用类型的值,并抛出;
最后由return指令结束方法
从上面的五个步骤中可以看出,需要从栈顶弹出两个实例对象的引用,这就是为什么会在new指令下面有一个dup指令
关于CC 在简单了解完逻辑之后,打算试一试扫描cc组件,但是没有出现任何的结果,于是就做了一些简单的修改,在gadgetinspector.GadgetChainDiscovery#isSink我增加了一条规则直接将org.apache.commons.collections.Transformer#transform 作为 sink
1
2
3
4
if (method.getClassReference().getName().equals("org/apache/commons/collections/Transformer" ) && method.getName().equals("transform" )) { return true ; }
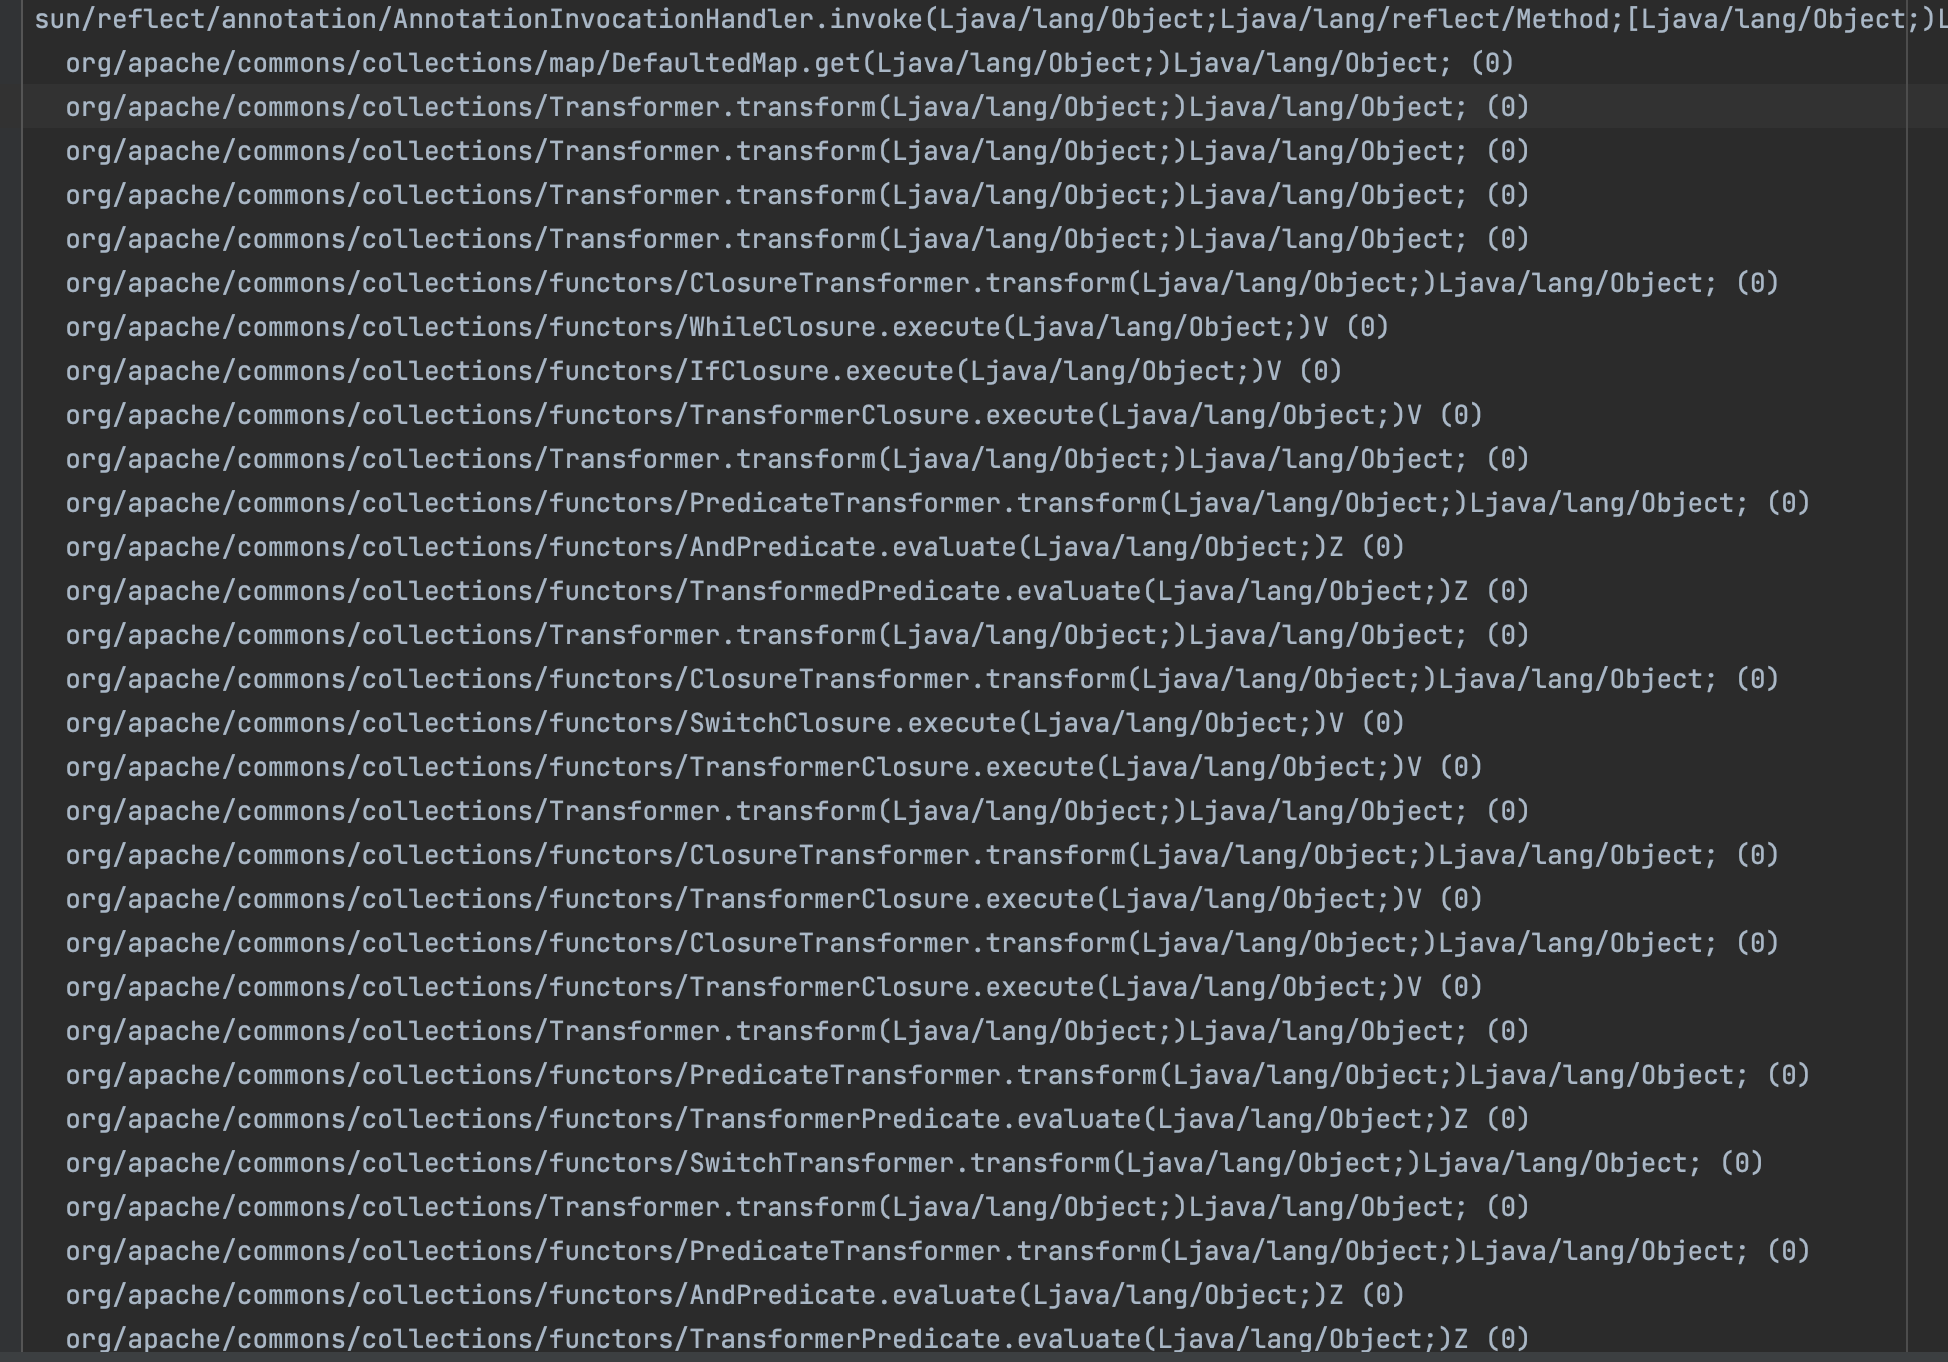
但是之后发现比如像AnnotationInvocationHandler这样的链,由于LazyMap在之前可能被添加到exploredMethods当中,导致利用链断了,后面自己尝试了下修复bug通过设置记录最大重复分支,但是发现重复利用链太多了,还是顶哦,还好发现了某个大师傅的宝藏仓库,里面对重复以及重复链做了聚合优化
https://github.com/5wimming/gadgetinspector/blob/main/src/main/java/gadgetinspector/GadgetChainDiscovery.java
看了思路后尝试自己修改,最终出来的结果这样看起来更直观666
之后还有其他问题比如像cc当中的有PriorityQueue的链子,由于下面这串代码也会受影响
1 2 3 4 if (graphCall.getCallerArgIndex() != lastLink.taintedArgIndex ) { continue ; }
暂时的解决方案就是注释掉这一行来获得所有利用链,但是就是太慢了,而且人工审计工作量更大
总之GI真的太笨重了,这里主要是学习原理也不想深入改bug了
参考文章 https://xz.aliyun.com/t/7058
https://cloud.tencent.com/developer/article/1633445
https://www.cnblogs.com/tr1ple/p/12800859.html
https://www.jianshu.com/p/dfdfdb455d8c
https://xz.aliyun.com/t/7058
https://paper.seebug.org/1034/